Google Chrome / Mozilla Firefox / Microsoft Edge 79 or later(Except Internet Explorer mode)
Mac
Safari / Mozilla Firefox
iOS
Safari
Android
Google Chrome
Recommended OS versions are based on the supports by Google, Apple, and Microsoft. * The new OS version will be added to the recommended OS about two months after it is released.
Recommended browsers are based on the latest edition of the Recommended OS.
You can use some functions on Old smartphone-optimized screens.
Please enable Cookies and JavaScript on your browser.
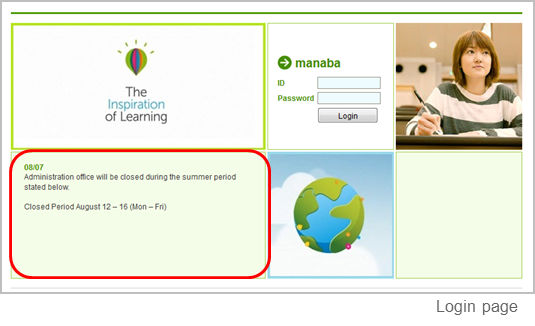
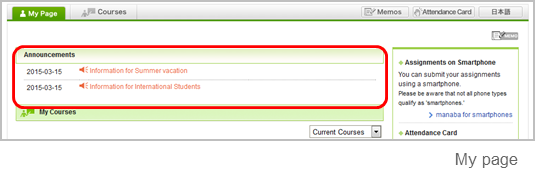
Announcements from Administration
There are announcements from the system administraion in the Login page and the My page. Please don’t miss it.
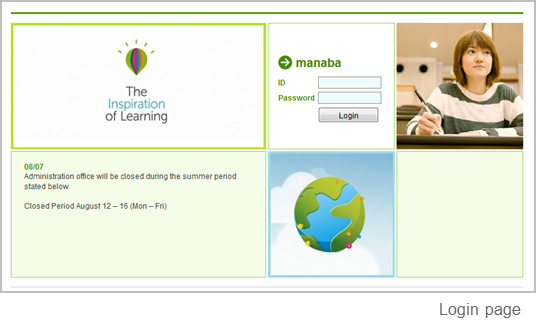
If your university use the unified authentication system, the school’s private login page will be displayed.
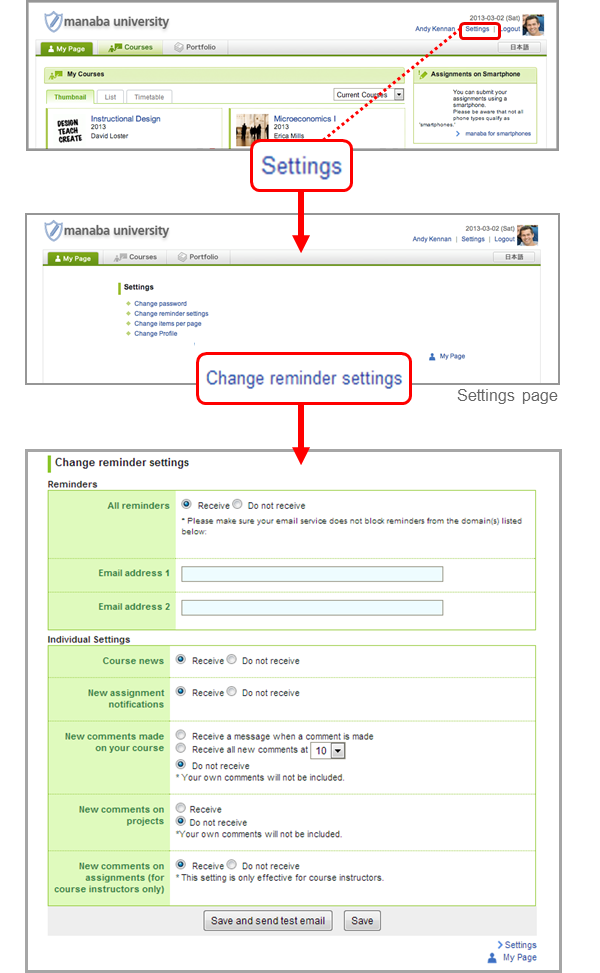
Change settings
Once you log into manaba, please configure the following settings from the Settings menu.
Reminder settings
You can receive reminders by email whenever new announcements are made or new posts are added.
Reminders
Click Settings in the upper right corner and select Change reminder settings.
Select Receive or Do not receive.
Enter in the Email address1 the PC Email address that you want reminders to be sent to.
Enter in the Email address 2 the cellphone Email address that you want reminders to be sent to.
Individual Settings
Select Receive or Do not receive a message whenever course news is posted.
Select Receive or Do not receive a message when a new assignment is published.
You may choose from one of three options when a new comment is posted on a thread:
Receive a message when a comment is made.
Receive all new comments at certain time of a day. (→ Select a preferred time from the dropdown menu.)
Do not receive a message.
Your own comments will not be sent as reminders.
Select Receive or Do not receive a message when a new comment is made in a thread of your project.
Select Receive or Do not receive a message when a new comment is made on your students’ assignments.
Click Save and send test email and confirm reminders are sent to the email address you registered.
You will not receive messages if you choose Do not receive in the Reminders menu, even if you choose Receive in Individual Settings.
Select Receive or Do not receive a message when a new assignment is published.
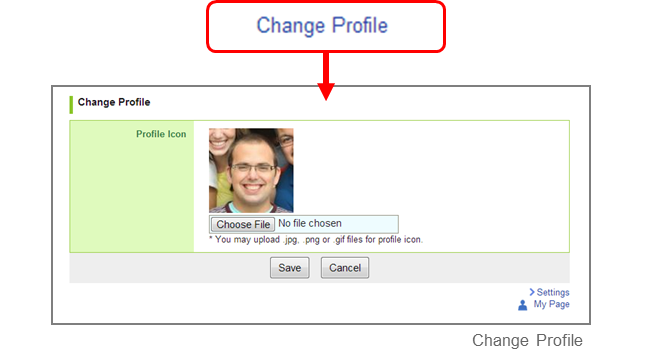
Profile settings
Click Settings on the upper right corner, and select Change Profile.
Upload an image of your choice.
The image you upload will be displayed beside your comments in a thread so that the course members will know whose comment it is.
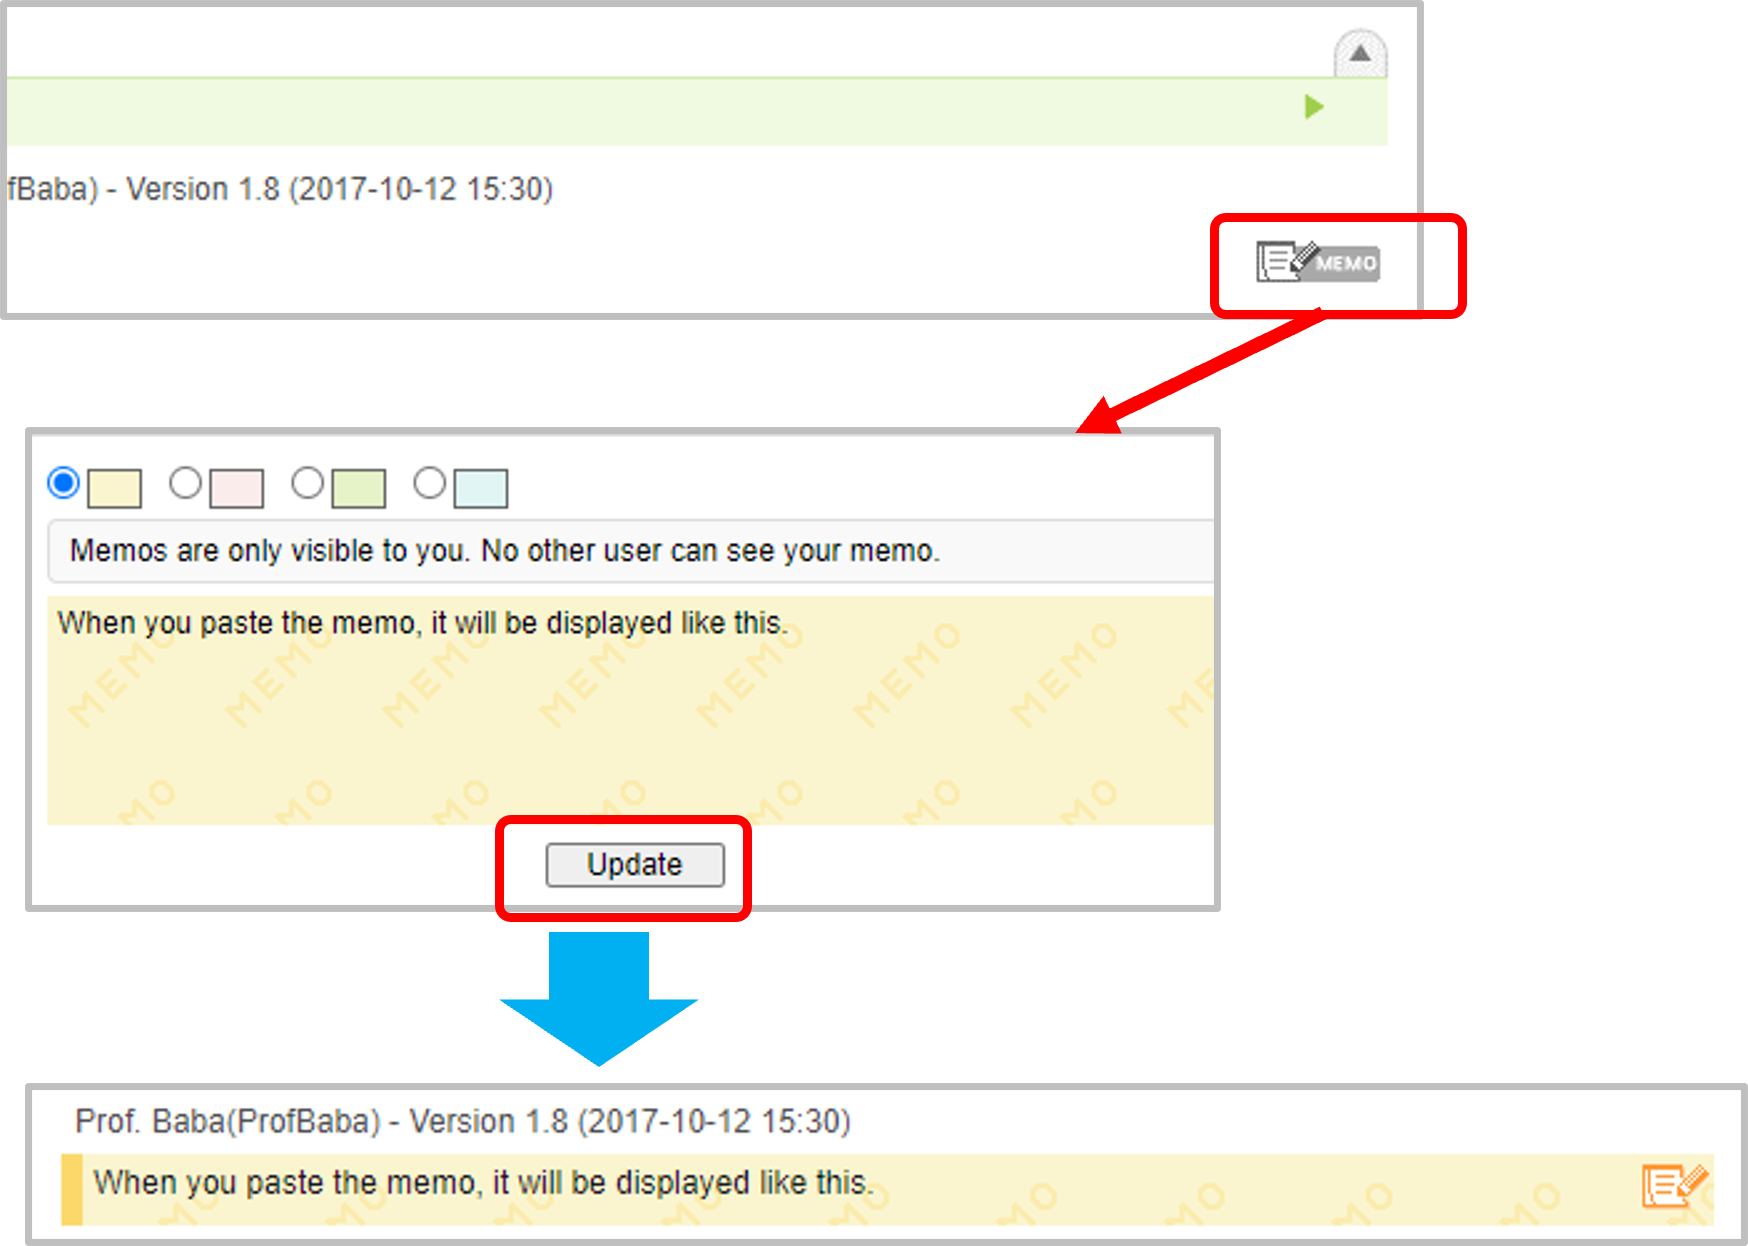
Memos
In forums, collections and other parts of manaba, the [Memo] button will appear. By clicking the button, you can write a memo.
A memo is only visible to you; other users will not be able to view your memos.
Add Memos
After clicking the Memo button, a new window will open.
Write the memo, and then click the Update button.
You can also display the written memo list by clicking [Memo] button at the top right of My Page. In the list ,there is link to the location of the memo.
What is a course?
In a course, instructors and students registered in the course have discussions in the forum, distribute / collect assignments or distribute course materials.
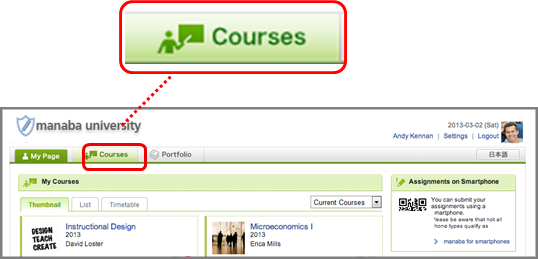
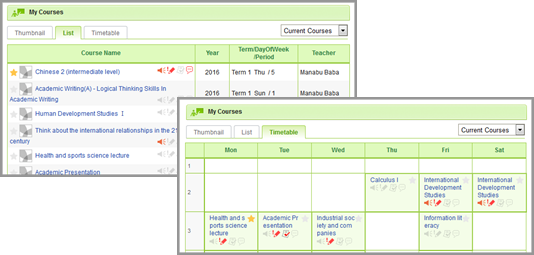
View your courses
In order to view a list of courses you have been registered for, click Courses at the top of the screen.
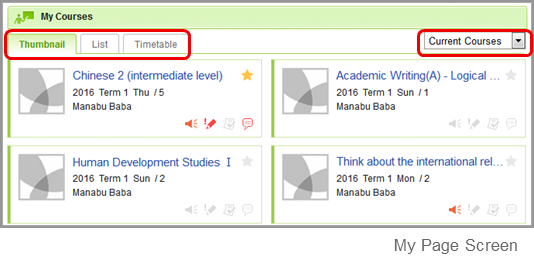
Change course display format
Display can be changed according to course status and format.
Current Courses ... Courses that can be used currently. Students can post comments in the forum and submit assignments. Past Courses ... Courses used in the past. Students can only view the forum and submitted assignments. Upcoming Courses ... Courses that will start in the future. Students cannot access the courses. All Courses ... All courses above are displayed.
"Timetable format" do not always correspond to your actual timetable in your school. For example, there are cases where the same classes which are held on multiple days of the week are grouped together.
If you want to display the particular course at the top of the list, click the star icon on the course.
The system administrator makes settings and conducts registration for manaba courses. The course settings and policies differ for each school. Contact the system administrator for details.
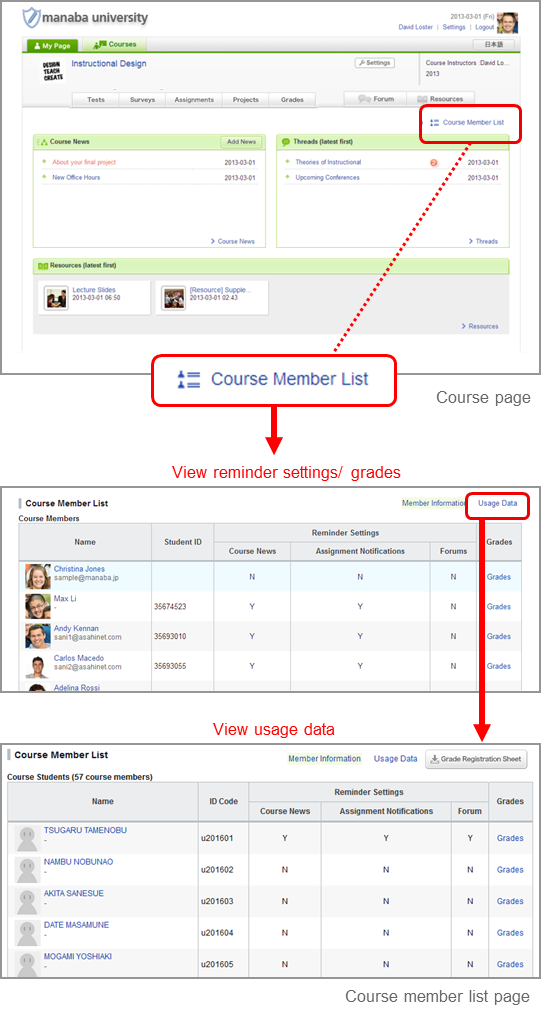
View course members
Instructors can view the members who have been registered in the course you are a part of. Click Course member list and a list of instructors and students will appear.
The Course member list is only visible to instructors.
Users whose ID has been deleted by the system administrator will not be displayed in the course member list.
View reminder settings / grades
In the Course member list, you may view the reminder settings of course members for the following items:
Course news
New assignment notifications
New comments in Forum
If reminder settings are set to Do not receive, “N” will be displayed for all items.
Even if reminder settings are set to Receive, if there is no email address entered, “N” will be displayed for all items.
We encourage you to make an announcement about reminders to the students in the first class of each course.
Also, if you click Grades for each student, you will be able to view every grade of tests and assignments that are assigned in the course.
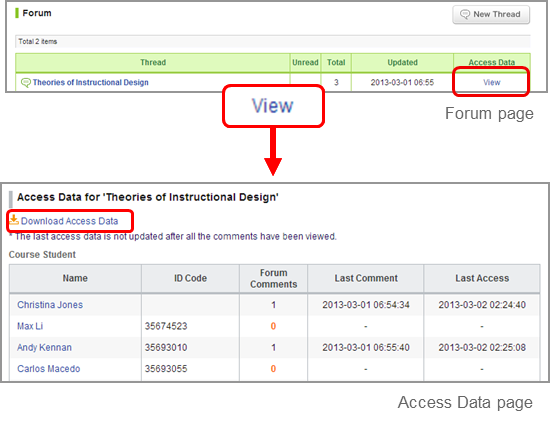
View access data
Click Usage Data and you can view the following data regarding instructors and students in the course:
Page views (# of pages)
Last access (# in the course)
Number of tests submitted (except for Exercise)
Number of surveys submitted
Number of assignments submitted
Number of Forum comments
Last comment in Forum
Deleted or closed tests, surveys and assignments are not counted in the submission count.
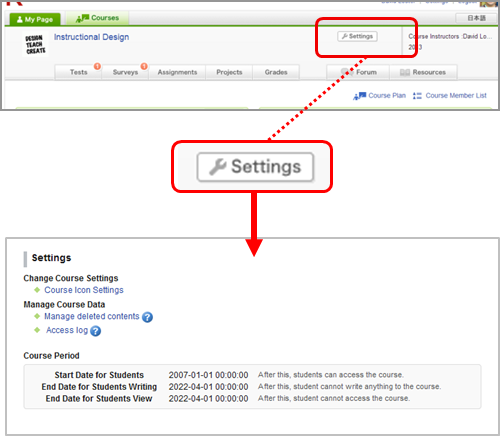
Perform course settings
By clicking the "Settings" button, you can make various settings for the course.
Course Icon Settings
You can set icons for the course. This icon is displayed in the course list of My page. Some sample icons are prepared, but you can freely set it by uploading the image (60 x 60 pixels).
If your Course Icon does not change even after the setting is done, try reloading your browser (clear your browser's cache).
Manage Course Data
You can confirm the assignment and grades deleted by someone, the student's operation within this course and the record of the screen accessed by the student.
Course Period
You can check the expiration date set for this course. The expiration date is set by the system administrator.
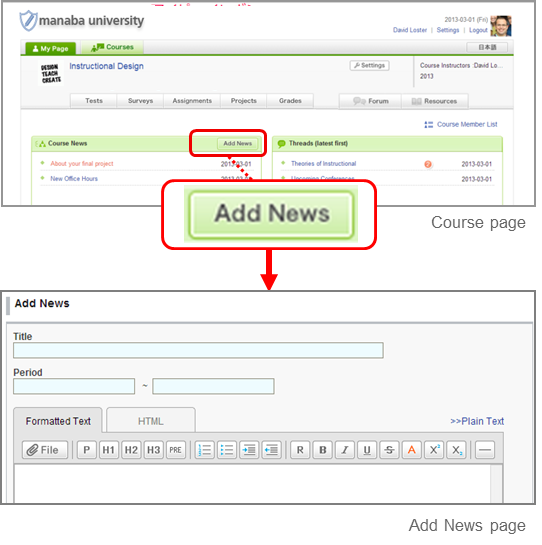
Add course news
Course News is a way for instructors to send out announcements about their courses to all course members (only instructors can add course news).
Click Add News on the course page.
Enter the title and write the content of the news.
Set the publication period of the news. (optional)
Click Preview to view the news as your students will see it. Then, click Publish.
You may send reminder emails to the students by using the Publish and send reminder function.
* If you send a reminder from "Upcoming Courses", students will not be able to access the URL of the reminder email.
View access data
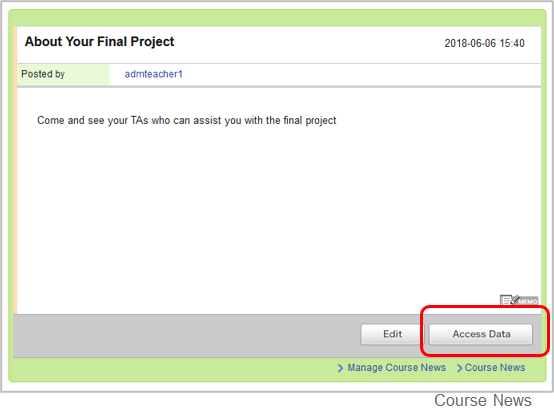
Click any course news you published.
In order to view the access data of the course news, click Access Data.
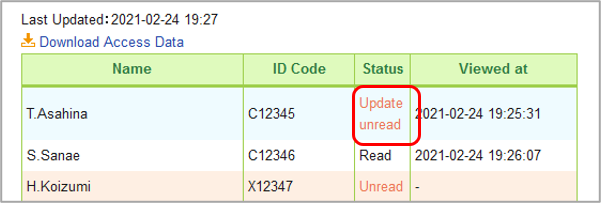
About status
Depending on the student's access, it will change into three status.
Unread : The course news has not been accessed by the student after it has been published.
Read : The course news was accessed by the student during the period for this resource to be published after it was published.
Update unread : Instructor has updated an already published course news (which students have accessed before), but that updated course news is not yet been accessed by students.
The student's first access to the newly published course news is displayed in the "Viewed at" column.
Even if the course news is accessed many times after the first access,unless the instructor edits the course news, the "Viewed at" column is not overwritten,and the first access is displayed.
If you access the course news again with the status of "Update unread", the status will be changed to "Read" and "Viewed at" column will be overwritten by the date and time of the re-access.
An orange line appears to the left of the first course news frame you view.
The orange line will remain faded for the first hour after it is displayed. After the hour is up, the orange line will disappear completely.
* When there is no access to the updated course news (when the status is Update unread), it turns back to orange.
Edit course news
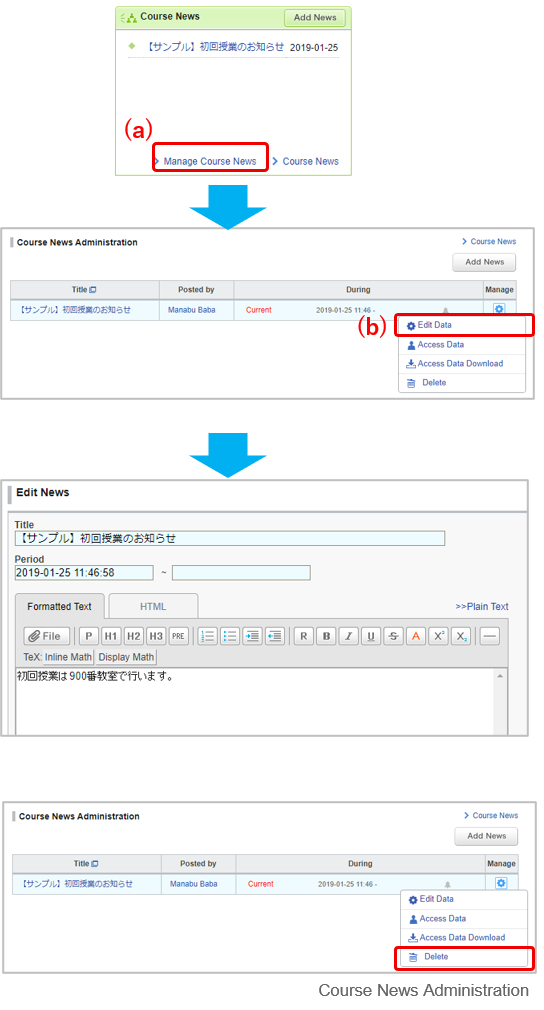
Click Manage Course News (a) in the Course Top page.
Click in Course News Administration page, and click Edit Date (b). * You can also click Edit (c) in Course News to go to the Edit News page.
Revise the course news and click Preview. * Course news is displayed in descending order of publication start date. If you want the edited course news to display at the top of the list, please set a new publication start date.
Click Update, and choose whether or not to send reminder.
In the reminder, it is not possible to confirm whether the course news has been edited.
So,Please include the word "add" in the title or the details of the edit in the body.
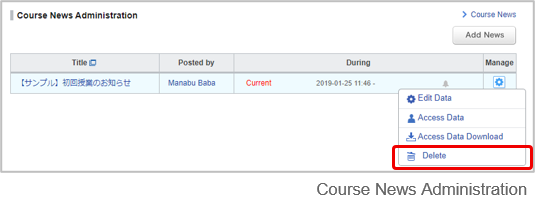
Delete news
Click Manage Course News in the Course Top page.
Click in Course News Administration page, and click Delete.
Tests
In the Tests function, instructors may hand out, collect and grade tests easily in manaba. Stimulate students’ motivation to learn by effectively using exercises and passing scores.
Types of tests
There are three types of Tests on manaba.
Autoscore test
Instructors can register answers and assign points in advance, and the student’s answers will be scored automatically after submission.
Manual score test
Instructors score the student’s answers manually after the submission.
Exercise
Students may repeatedly answer this type of test in order to practice. Unlike Autoscore tests, the grades will not be registered automatically.
Add an autoscore test
Click Add Test in the Tests Administration page.
Select Autoscore Test.
Enter the title and the description of test.
Enter a start date and end date for the test. If you click the Start and End fields, a calendar will appear. Select a date and time, and click OK. (optional)
Students cannot submit their answers to a test after the end date.
Select the time of publishing test results and correct answers.
Click Next.
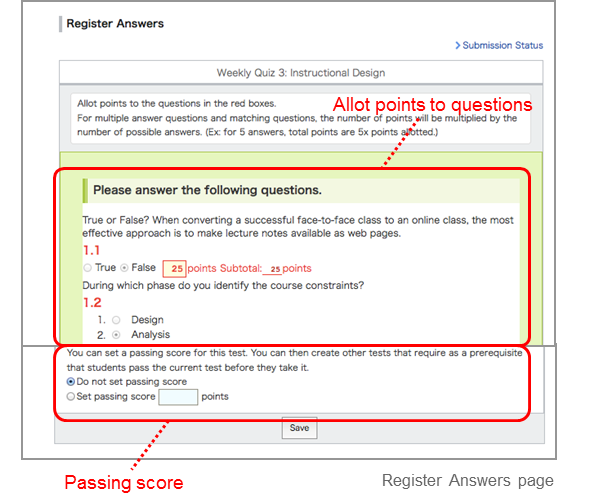
Register answers and points to the questions.
If there are multiple correct answers for a Text line question, separate the answers with a semicolon (‘;’).
For Multiple(1), Multiple(2), True/False, Dropdown and Matching questions, register the correct answers by selecting the correct choices on each question.
For Ordering questions, click choices in the correct order. Click to clear the selections.
Register points in the red box shown next to each question.
For Multiple(2) and Matching questions, register points per choice. The total points will be automatically calculated by multiplying by the number of choices. (Ex: If 2 points are registered per choice and there are five choices registered, the total points will be 10.)
For Multiple(2), you can also register points per question.
Answers in a text box and an uploader cannot be autoscored.
You cannot download all answers at once when marking. Please use the Assignments if you need to download all the answers at once.
To set a Passing Score for a test, select Set passing score and enter a passing score.
Passing scores can be used as prerequisites for a student to take other tests.
Be sure to set the Passing Score before the start date. If you set them after students have submitted their answers, they will not be scored for pass or fail.
Click Save to save the test in manaba.
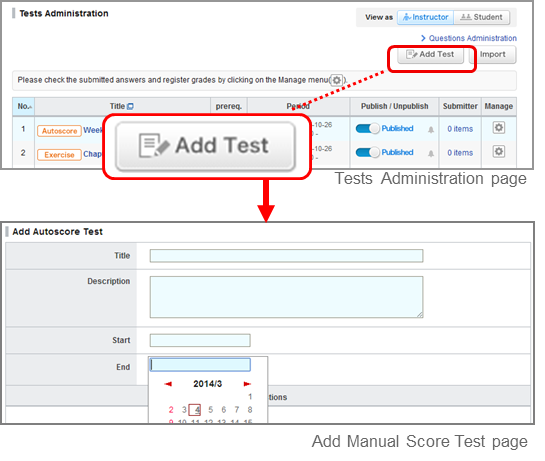
Add a manual score test
Click Add Test on the Tests Administration page.
Select Manual Score Test.
Enter the title and the description of the test.
Enter a start date and end date for the test. If you click the Start and End fields, a calendar will appear. Select a date and time, and click OK. (optional)
An exercise is a type of test where questions are randomly picked from a pool of exercise questions that the instructor registers in advance. You may set up an exercise to be available for students to take multiple times.
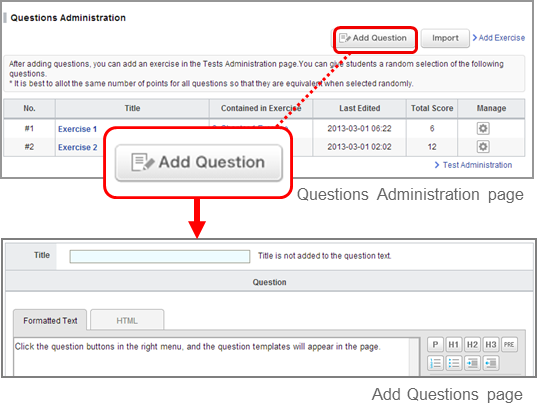
STEP 1. Add a question
Click Questions Administration on the Tests Administration page.
Click Add Question in Questions Administration page.
Register answers and points to the questions and click Save to save the question in manaba.
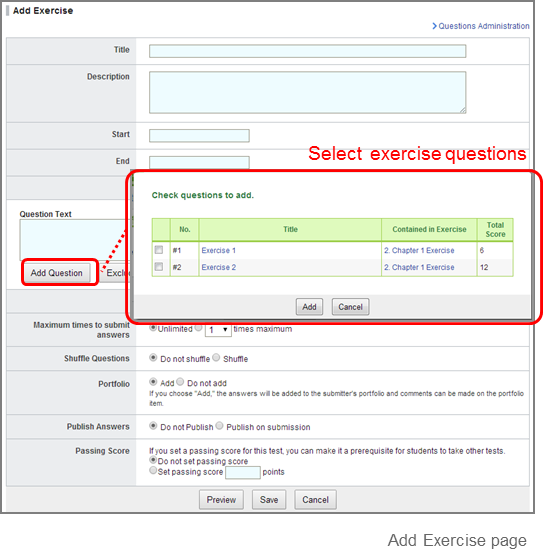
STEP 2. Add an exercise
Click Add Test on the Tests Administration page.
Select Exercise.
Enter the title and the description of the exercise.
Enter a start date and end date.
Write the Question Text.
Click Add Question, select exercise questions that you registered in STEP 1, and click Add. Should you want to exclude questions that you selected from an exercise, check those questions and click the Exclude Checked button.
Set the number of questions which should be chosen randomly in an exercise out of the number of questions you selected in 6.
Set the maximum times that a student is allowed to submit answers.
If the order of the options in a question needs to be randomized when a student answers it, choose Shuffle for Shuffle Questions.
If you select Publish on submission for making the correct answer available after the student has submitted an answer, they will be able to check whether or not their answer was correct on the Results page.
You may choose Set passing score to register a passing score.
Click Preview to view the exercise as your students will see it.
Click Save and save the exercise in manaba.
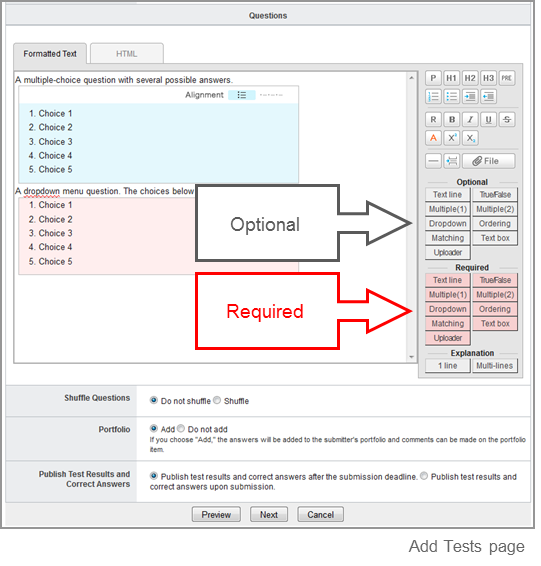
Types of questions
You can add 8 types of questions in a test.
Text line
A question which allows for entering a word or a phrase.
Multiple(2)
A question which allows to select one or more answers from a list of possible answers.
Dropdown
A question which allows to select one answer from a list of possible answers. It is similar to a single answer question, but useful to save space for other questions.
Matching
A question which allows to match words or statements against another list of words or statements.
Multiple(1)
A question which allows to select only one answer from a list of possible answers.
True/False
A question which allows to select True or False.
Ordering
A question which allows to place answers in a particular order.
Text box
A question which allows to write paragraphs.
Uploader
A question which allows to upload a file.
"Semicolon(;)", "Half-width Katakana" and "Full-width alphanumeric characters, spaces, hyphens etc." cannot be registered as correct answers or submitted as answers in a Text line question.
Automatically, "Half-width Katakana" answers will be converted to full-width characters, and "Full-width alphanumeric characters, spaces, hyphens etc." answers will be converted to half-width characters before being registered.
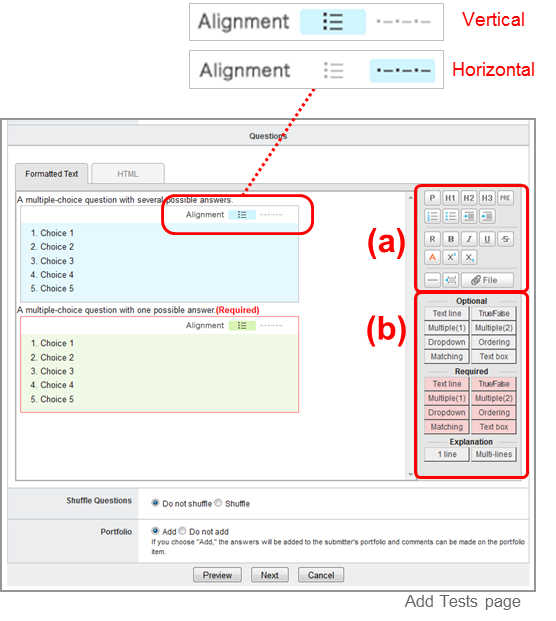
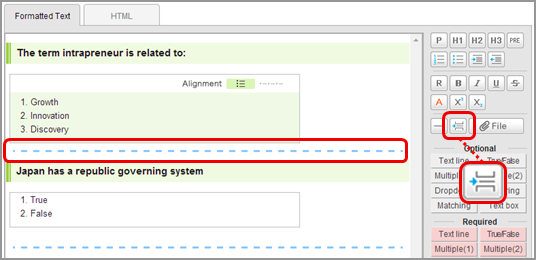
Add a test question
Let’s add a test question. Click a button in area (b) and a question template of your choice will be inserted.
Overwrite the example question with the one you would like to ask.
Should you want to format your text with headlines or bold text etc., use buttons in area (a).
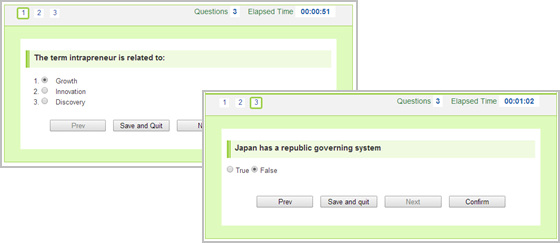
If the order of the options in a question needs to be randomized when it is answered, choose Shuffle in the Shuffle Questions field.
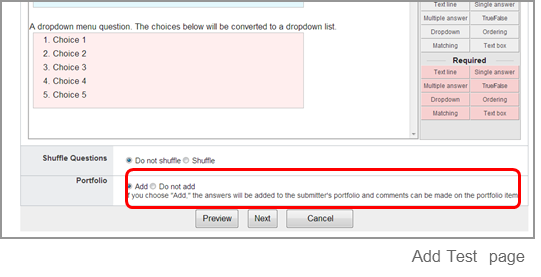
In the Portfolio field, select "Add" if you want to add a submission to a student's portfolio. Only when the submission is added to the student's portfolio, the instructor and the student himself/herself can post a comment.
Click Preview to view the exercise as your students will see it.
If you place a Required question, students will not be able to submit their answer unless they answer it.
You may select the style of the list of answers (vertical or horizontal) by using the buttons within the frame of the possible answers.
If the list of possible answers is composed of short words or phrases, you may want to select “horizontal” as you can save space on the page.
With "Autoscore test" and "Manual score test", you can create up to 100 questions per test. If the number of questions exceeds 100, you can save the test but you can not publish it.
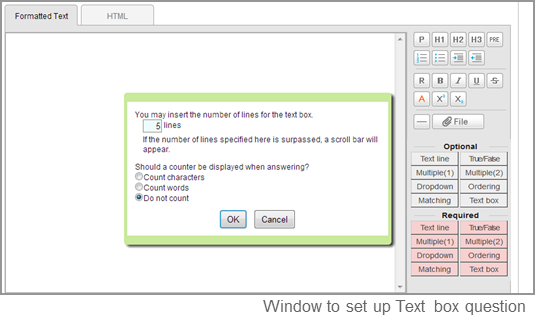
Enter a text box
Click Text box and a window to set number of lines for the text box and the word/character counter will appear.
Number of lines
Enter the number of lines you would like in the text box.
Number of lines you enter does not determine the amount of text students can write in the text box.
Character count
Both half-width and full-width characters, symbols and space are counted as one character. Line breaks are not counted.
Word count
Mostly used for questions that allow to type text in English. Words are counted correctly if they are separated with a half-width space; note that they are not counted if separated with a full-width space. If you break a line, it will be counted as one word.
Number of lines and word/character counter will be a guide for students to know how much they should write.
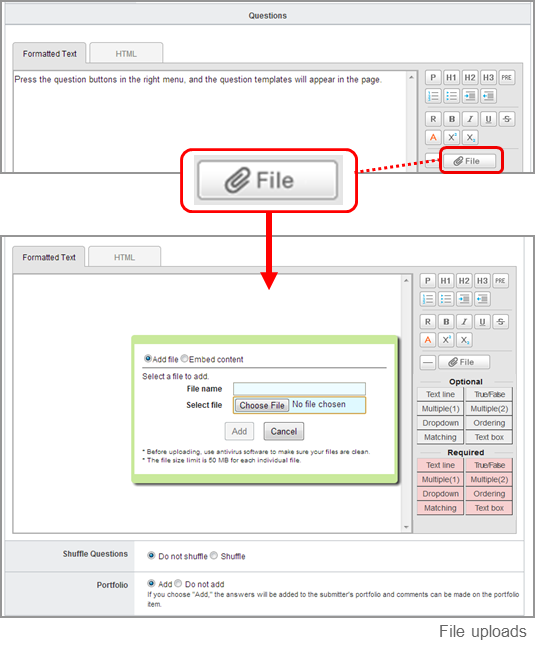
How to add a file
You may add files such as Word documents, images, and videos inside a question.
Uploading video files or images from your computer
Click File button.
Enter the title of the file.(optional)
Locate the file of your choice and click Add file to upload the file into manaba.
Click Add and complete the process.
Types of files that can be previewed
Image files (GIF, JPG, PNG files, etc.)
Video files (MP4, m4v, WMV, MOV, MPEG files, etc.)
Audio files (mp3, m4a files, etc.)
You may need to install one or more video players in order to play the uploaded video files. Depending on the browser, you cannot play the file on the screen.
MP3,MP4 files can be played on smart phones and tablets.
Embed videos from YouTube
Click File.
Select Embed content.
Enter the embed code of the video you would like to embed.
Press OK and complete the process.
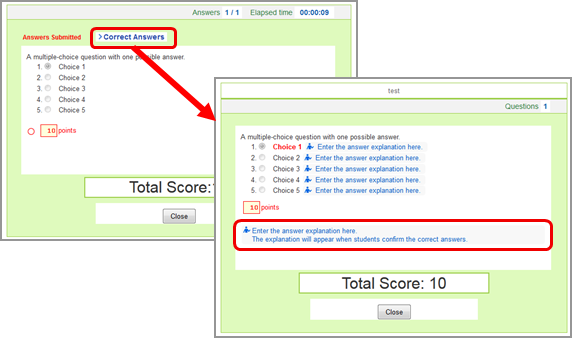
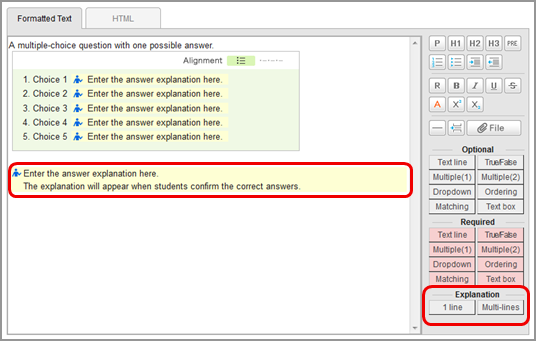
Insert an explanation
Click Explanation button, and you can insert the explanation in the question. (The explanation cannot be inserted for Choices of True / False questions.) You can select two types of the explanation below.
1 line
A explanation which you would like to insert into the individual question.
Multi-lines
A explanation which you would like to insert into the whole question.
The explanation is not displayed when the student answer the questions. The background color of the description is yellow on making questions.
Set a page break
Click the Page break button, and you can specify the position of page break. Pages will be switched at the place indicated with a blue broken line.
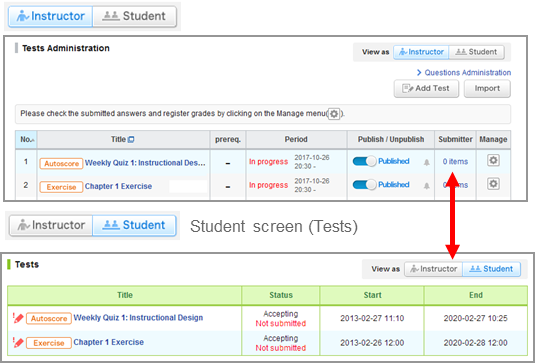
Publish a test
In order to publish a test to students, click on Tests Administration page.
Should you wish to send a reminder message, click Publish and send reminder.
Use Student button to view the list of tests which are published to students.
If you set a period, students can only respond after the start date; before the start date, the status of the test will be set as “Pending.”
About Multiple Selection
In Multiple Selection in the upper right corner of Tests Administration page, you can choose to publish, unpublish or delete all the selected tests in bulk.
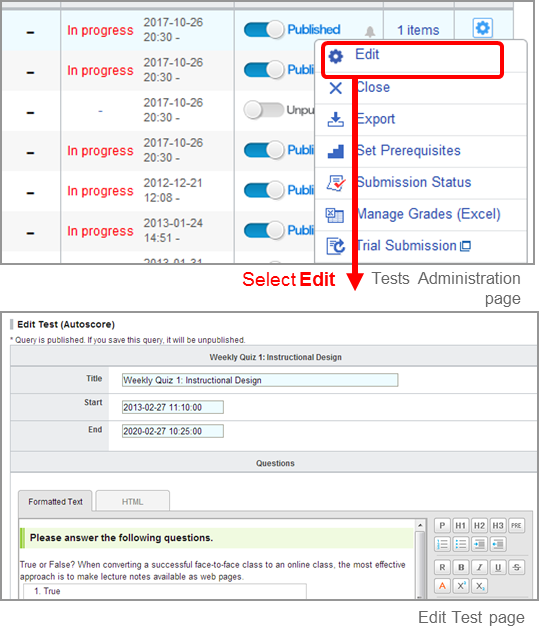
Edit a test
Follow the steps below, in order to change the dates or questions of a test.
Click on Tests Administration page and select Edit.
Revise the test and click Save. * Save the test after registering answers and allotting points if it is an autoscore test.
If you edit a test, it will automatically be unpublished. Once you finish editing, please publish it again.
Questions you are currently using for an exercise cannot be edited. Exclude questions from the Edit Exercise page and revise the question in the Manage Exercise Questions page.
To avoid student confusion, editing the title of a test after a student's answer and grade registration will not be reflected in the grade and portfolio title. (Grades titles can be manually edited from the edit page.)
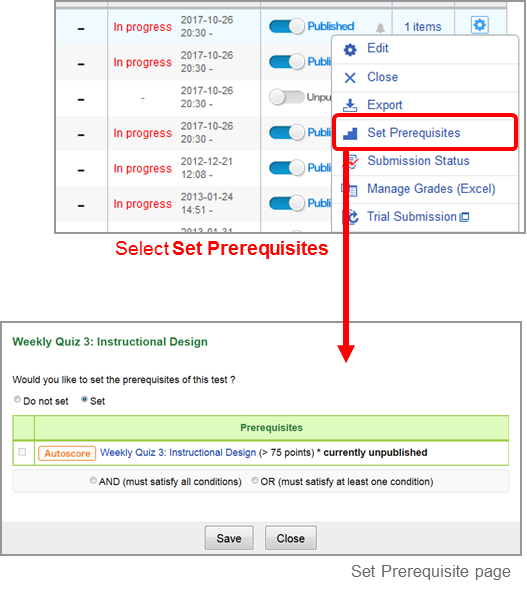
Set prerequisite
Instructors may set a prerequisite for students to take a test based on whether they achieved a passing score on another test.
Click on Tests Administration page and select Set Prerequisites.
If you select Set, a list of tests which are set up with passing scores will appear.
Select all the tests you would like to set as prerequisites and click either AND or OR. * If you select AND: Students need to pass all the tests. * If you select OR: Students need to pass at least one of the tests you selected. * If you have selected only one test, you may click either AND or OR.
4. Click Save and finish the process.
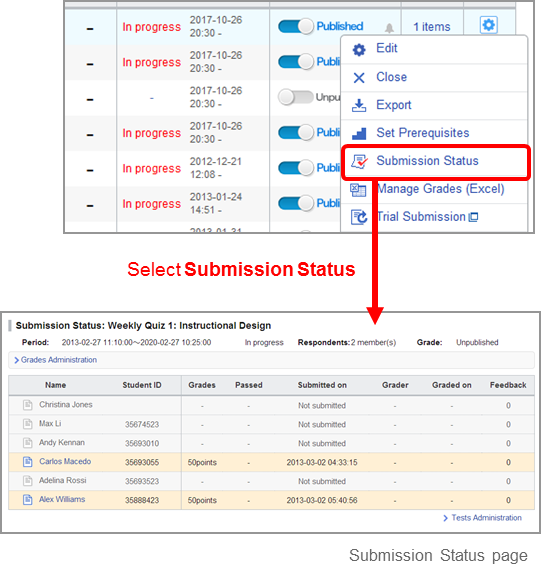
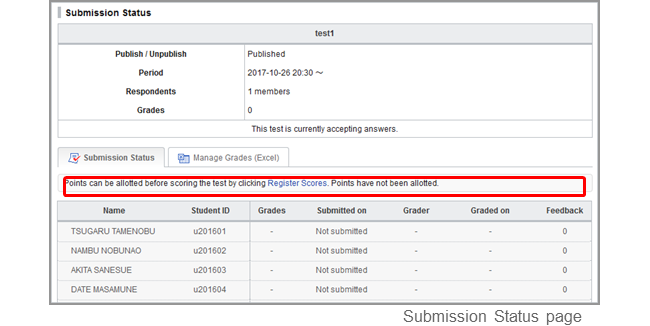
View submission status
You may view the names of the students who submitted answers to a test and their scores or grades.
Autoscore test / Manual score test
Click of a test in Tests Administration page and select Submission Status. A list of students and their submission status for the test will appear.
Exercise
Click of a test in Tests Administration page and select View Scores. A list of students and their scores for the test will appear.
If answers has been temporarily saved, * Saved data appears in the Submitted on column for students who have not yet submitted the test. *Answers are saved when the student clicks on Quit (Save), Confirm, Prev, or Next while answering.Or the answers are saved every 30 seconds after the student starts to answer. And you can check the answers before the submission is finalized and complete the submission on the student's behalf.
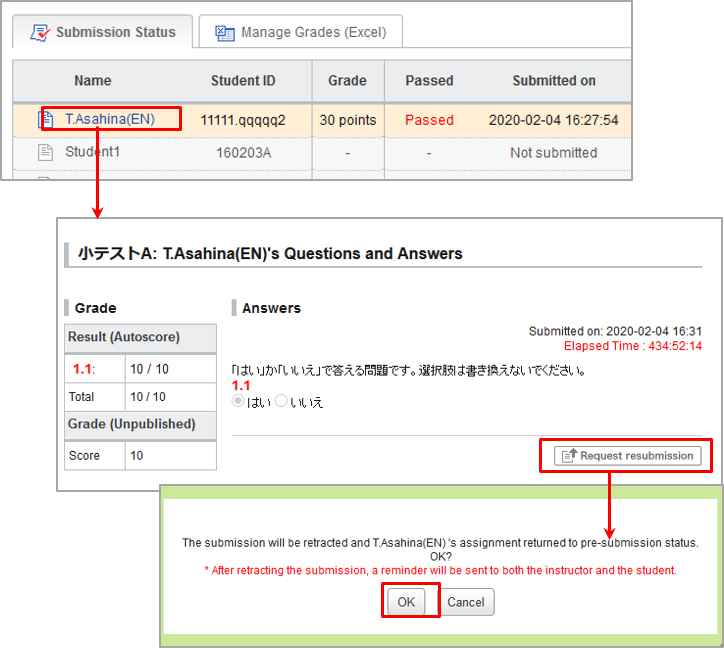
Request resubmission
In the following the steps, the instructor withdraws the student's answers that has already been submitted and can return to the state before the submission was confirmed. (Excluding Exercise)
After withdrawal by the instructor, students will be able to access the test and respond again.
Click on the name of the student whose assignment you wish to withdraw in "Submission Status".
Click the "Request resubmission" button on the "Student's Questions and Answers" screen.
Click "OK" button on the confirmation screen.
The answer before resubmission is retained.
Reminders are sent to the submitter and the instructor.
If pass conditions are set, students who pass once will remain passed even if the instructor withdraws the answer.
If the instructor withdraws the answer, the grade will also be deleted.
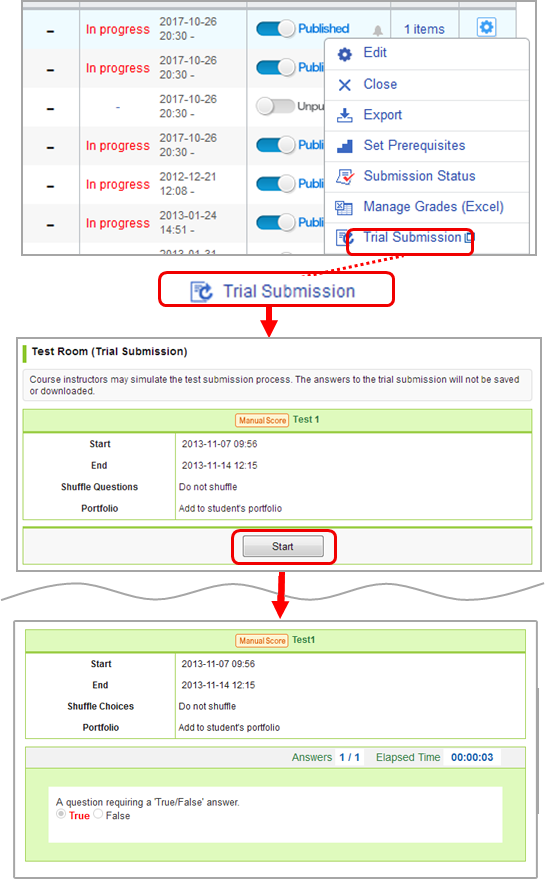
Trial submission function added to tests and surveys
The course instructor can simulate submission for tests and surveys from the Tests Administration and Surveys Administration pages.
The trial submission function allows the instructor of the course to confirm the submission procedure of the test or survey, as many times as wanted, regardless of the acceptance and submission status.
The trial submission can be made in the following way:
Find the test or survey for which you want to make a trial submission and click on the gear icon in the Manage column of the Test Administration or Survey Administration page.
Click Trial Submission.
Click on the Start button to start the test. The answering steps are the same as how students would answer the test.
If you want to finish the trial submission, close the tab of the window.
Trial submissions for tests will not be included in the test evaluation sheet. The trial submission results will not affect the highest score, either. The passing score you set up will be ignored, too, so you may simulate the submission for any tests you add.
Score and register grades of a test
There are two methods to score and register grades of autoscore tests and manual score tests. * If you need to register grades for an exercise, you may do so in the Grades tab. ( See Also “Register grades”)
A: Score a test and register grades individually through the web (Only available for manual score test).
B: Download a Test Evaluation Sheet, score students’ answers and register grades for all students in a batch.
A: Score a test / Register grades on the web
STEP 1. Register scores
Click on Tests Administration page and select Submission Status.
Click Register Answers on the submission status page.
Enter points of questions.
Set passing score if needed.
Click Save and finish the registration process.
You can score multiple choice and matching question in two patterns bellow.
Partial Match:The points you register will be multiplied by the number of choices, and that will make the total points of the question. (e.g. In a 5-choice question where 1 point is allotted for each choice: if 3 choices are selected or not selected correctly, the total points for this question will be 1 point x 3 correct choices = 3 points.)
Exact Match:The points you register will be the full points for the question.(e.g. If 5 points is allotted for a 5-choice question, 5 points will be scored only when student chooses all the correct answers. If any of the choice is incorrect, students will get 0 point.)
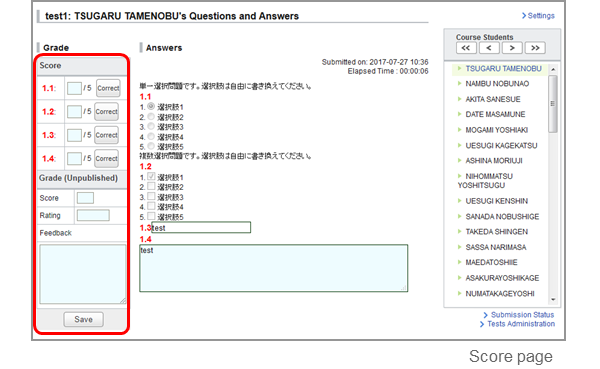
STEP 2. Score a test individually
On Submission Status page, click name of each student. Student’s answers and the score field will be displayed.
Click Correct if student’s answer is correct; manaba will add up the score automatically. If you would like to give partial credit to an answer, enter points in the box.
Enter Rating In case of evaluating with character string such as "Good,Excellent,A,B". (optional)
Enter Feedback about the student’s test.(optional)
If there is no revision to make, click Save and complete the score count.
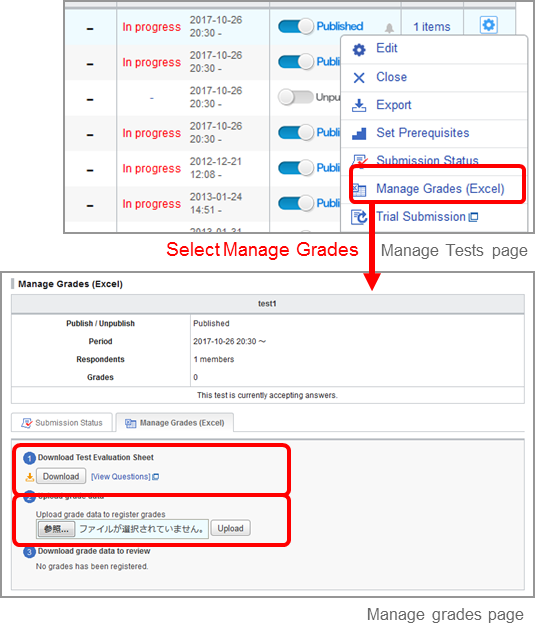
B:Score a test / register grades using an Excel sheet
Click on the Tests Administration page and select Manage Grades (Excel) .
Click Download in Test Grades administration page and download Test Evaluation Sheet.
Enter in either "#Score","#Rating" or "#Comment" on the Test Evaluation Sheet.If you would like to register a score of 0, please input 0 in "# Score". *Test sheets of autoscore tests already have grades entered.
The test evaluation sheet of for the Autoscore Test has already been entered with the total score.
Enter scores for text box answers in the column titled “# item 1, 2, 3,…”. The total score is updated once you enter points for each question.
If you have registered scores on the web, the test evaluation sheet for Manual Score Test will have a string of "********" in the unanswered "expected" cell.
Upload an Excel file with grades and complete registration of grades.
You cannot upload grades of an autoscore test until you click Close Test and Publish Correct Answers first.
Publish grades
Autoscore tests
Once students submit their answers, their grades will be published.
Manual score tests
Grades are not published when they are registered using either the web or Excel sheets. Grades are published in the following way:
Click the Grades tab and open Grades Administration page.
Click of the test you would like to publish.
Should you wish to send a reminder message, click Publishand send reminder.
Import / Export a test
Instructors may export a test and save it to own their computer. You may replicate the test in another course by importing data you have exported.
Export an autoscored / manual score test
Export tests one by one
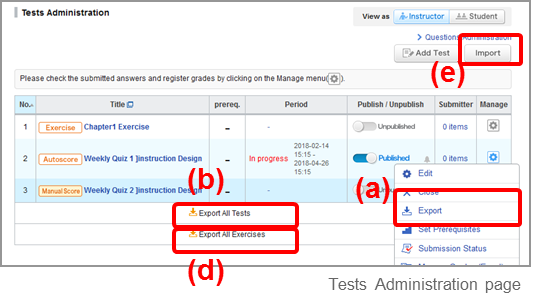
Click of a test on Tests Administration page and select Export (a). The test will be downloaded as an MHT file.
Export all tests in a course
Click Export All Tests(b) at the bottom of the list and a zip file containing all the existing tests will be downloaded.
Export exercises
Export questions one by one
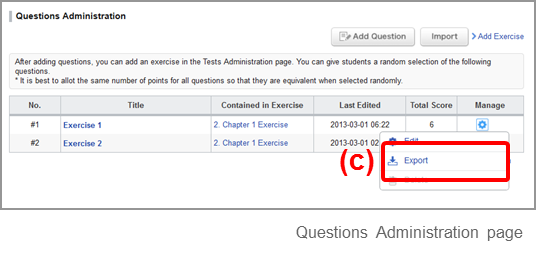
Click of an exercise and select Export (c) on Questions Administration page. The questions will be downloaded as an MHT file.
Export all exercises and questions in a course
Click Export All Exercises (d), and a zip file containing all the existing exercises and their exercise questions will be downloaded.
Import a test or exercise
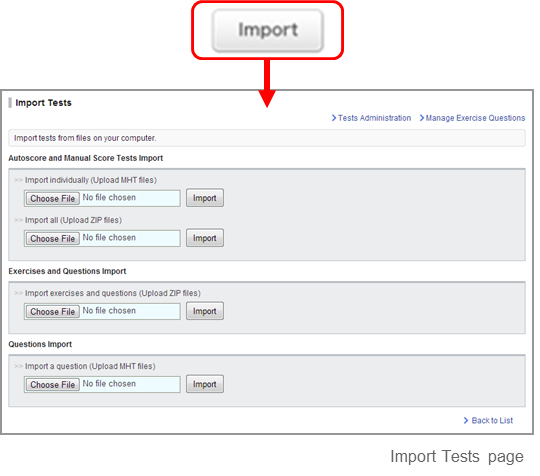
Click Import (e) on Tests Administration page and upload the test / exercise data. There are three different kinds of data that you can upload. The sections to importare different: ・Autoscore tests / manual score tests ・Exercises and exercise questions ・Exercise questions
Import an autoscore test and manual test
Use Import individually (Upload MHT files) under Autoscore and Manual Score Tests Import if tests should be uploaded one by one. Use Import All (Upload ZIP files) below if tests should be uploaded all together in a zip file.
Import an exercise and exercise questions
Use Import All (Upload ZIP files) under Exercise and QuestionsImport if an exercise and its questions should be uploaded all together in a zip file. Use Import individually (Upload MHT files) under Questions Import if exercise questions should be uploaded one by one.
When importing an exported MHT/ZIP file into manaba, the maximum size that can be imported at one time is about 400MB.
Imported tests need to be published.
Survey
Instructors may hand out and collect surveys easily in manaba.
Add a survey
Click Add Survey on Surveys Administration page.
Enter the title of the survey.
Enter a start date and end date for the survey.(optional) If you click the Start and End fields, a calendar will appear. Select a date and time, and click OK.
In the Portfolio field, select "Add" if you want to add a submission to a student's portfolio. Only when the submission is added to the student's portfolio, the instructor and the student himself/herself can post a comment.
Set resubmission permission / non-permission.
If resubmission is set, students will be able to return and resubmit the submitted answers before the submission is confirmed within the application period.
Instructors will not receive a reminder when a student returns before submitting.
Use the Preview button to view the survey as your students will see it.
Click Save and save the survey in manaba.
Students cannot submit their answers to a test after the end date.
Publish a survey
In order to publish a survey you add, click on Surveys Administration page.
Should you wish to send a reminder message, click Publish and send reminder.
Use Student button to view the list of surveys which are published to students.
If you set an acceptance period, students can only respond after the acceptance start date; before the acceptance start date, the status of the survey is set as “pending”.
Edit a survey
Follow the steps below, in order to change the acceptance dates or questions of a survey.
Click on Surveys Administration page and select Edit.
Revise the content of the survey and click Save.
If you edit a survey, it will automatically be unpublished. Once you finish editing, please publish it again.
To avoid student confusion, editing the title of a survey after a student's answer and grade registration will not be reflected in the grade and portfolio title. (Grades titles can be manually edited from the edit page.)
Collect survey responses
Click on Surveys Administration page and select Collect.
Click Download results.
An Excel sheet with a list of students with their answers to the survey will download.
Import / Export a Survey
Instructors may export a survey and save it to own computer. The survey will replicate the survey in another course by importing data you have exported.
Export
Export a survey individually
Click in Surveys Administration page and select Export (a). The test will be downloaded as an MHT file.
Export all surveys in a course
Click Export All Surveys (b) and a zip file containing all the existing surveys will download.
Import surveys
Click Import (c) on Surveys Administration page.
Use Import individually(Upload MHT files) if surveys should be uploaded one by one. Use Import All (Upload ZIP files) if surveys should be uploaded all together in a zip file.
When importing an exported MHT/ZIP file into manaba, the maximum size that can be imported at one time is about 400MB.
Imported surveys need to be published.
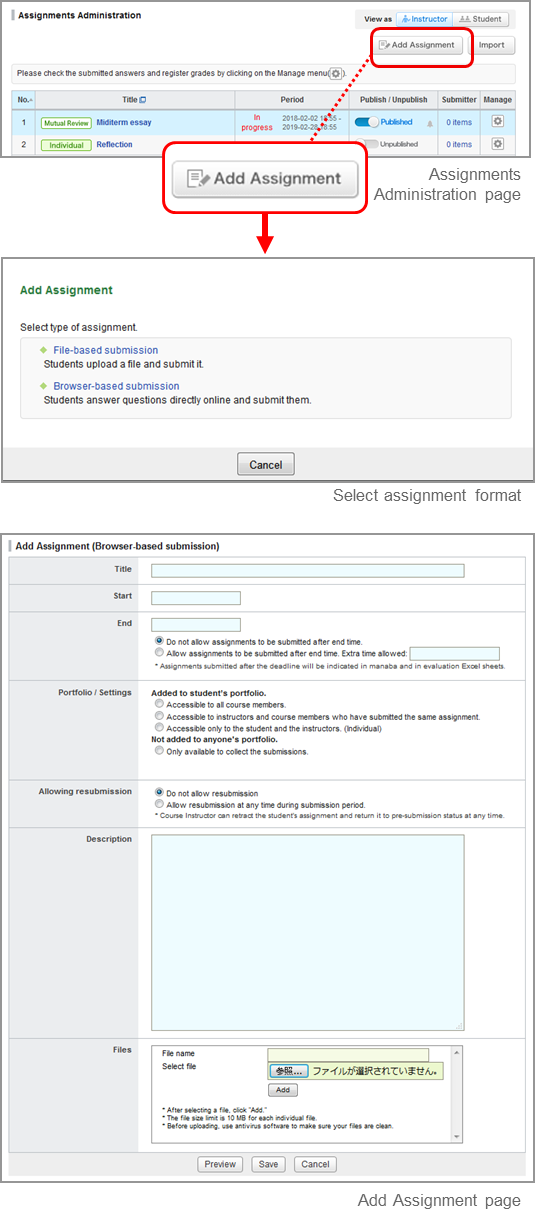
Assignments
Instructors may hand out and collect an assignment easily in manaba.
Add an assignment
Click Add Assignment on Assignments Administration page.
Select the format of the assignment (form-based or file-based).
File-based submission
These are assignments for which students send responses in files, such as Word documents.
Browser-based submission
These are assignments for which students answer questions in the web browser.
The number of characters in the answer is counted as follows.
Character count
Both half-width and full-width characters, symbols and space are counted as one character. Line breaks are not counted.
Word count
Mostly used for questions that allow to type text in English. Words are counted correctly if they are separated with a half-width space;note that they are not counted if separated with a full-width space.If you break a line, it will be counted as one word.
Enter the title of the assignment.
Enter a start date and end date for the assignment.(optional) Click OK.
Students cannot submit their response to the assignment after the end date.
Select Allow assignments to be submitted after end time and select the extra days you want to give. Late submissions will be accepted within the days you grant.
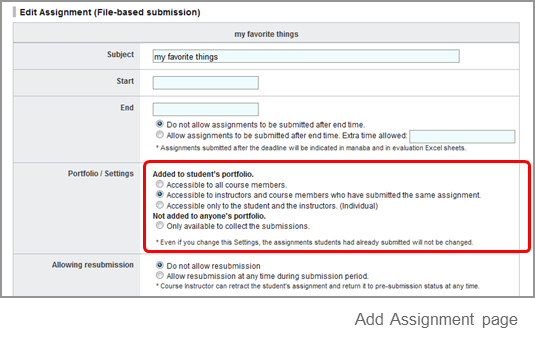
In the Settings field, select how you would like the assignment to be handled.
Accessible to all course members.
All course members can access and comment on the student’s response.
Accessible to instructors and course members who have submitted the same assignment.
Only instructors and those who have already submitted an assignment on the same topic can access and comment on the response.
Accessible only to the student and the instructors. (Individual)
Only the student and the instructors of the course can access and comment on the response.
Only available to collect the submissions and is not added to anyone’s portfolio.
The instructor collects only the student's responses. The student responses will not be added to their portfolio. Also, mutual reviews and posting comments are not available.
Set whether to allow or disallow resubmissions.
Write the description of the questions you would like to ask students.
Use the Files section to add various files you would like your students to use for reference when completing the assignment, such as PDF files and images.
Click Preview to view the assignment as your students will see it. Click Back after you check the preview.
Click Save to save the assignment in manaba.
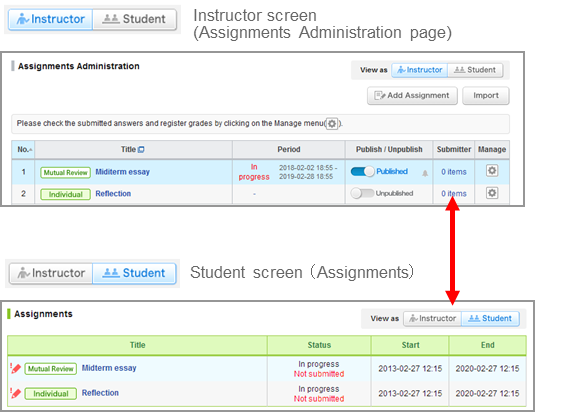
Publish an assignment
In order to publish an assignment you add, click on Assignments Administration page.
Should you wish to send a reminder message, click Publish and send reminder.
Use Student button to view the list of assignments which are published to students.
If you set a period, students can only respond after the start date; before the start date, the status of the assignment is set as “pending”.
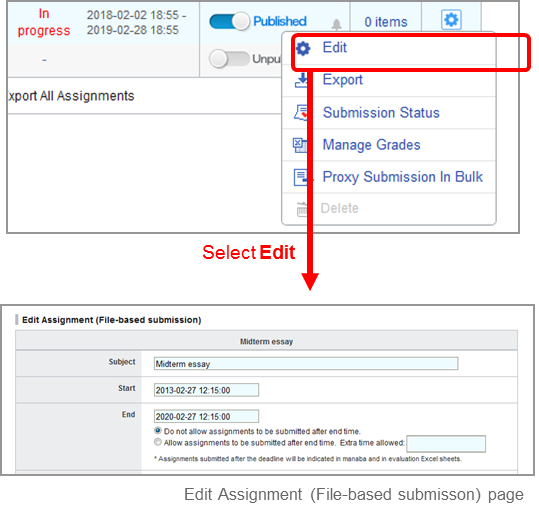
Edit an assignment
Follow the steps below, in order to change the dates or questions of an assignment.
Click on Assignments Administration page and select Edit.
Revise the assignment and click Save.
If you edit an assignment, it will automatically be unpublished. Once you finish editing, publish it again.
To avoid student confusion, editing the title of an assignment after a student's answer and grade registration will not be reflected in the grade and portfolio title. (Grades titles can be manually edited from the edit page.)
In the Assignment, you can change "Portfolio / Settings" later after submitting the student. If you select "Only available to collect the submissions.", the submission will be hidden from the student portfolio.
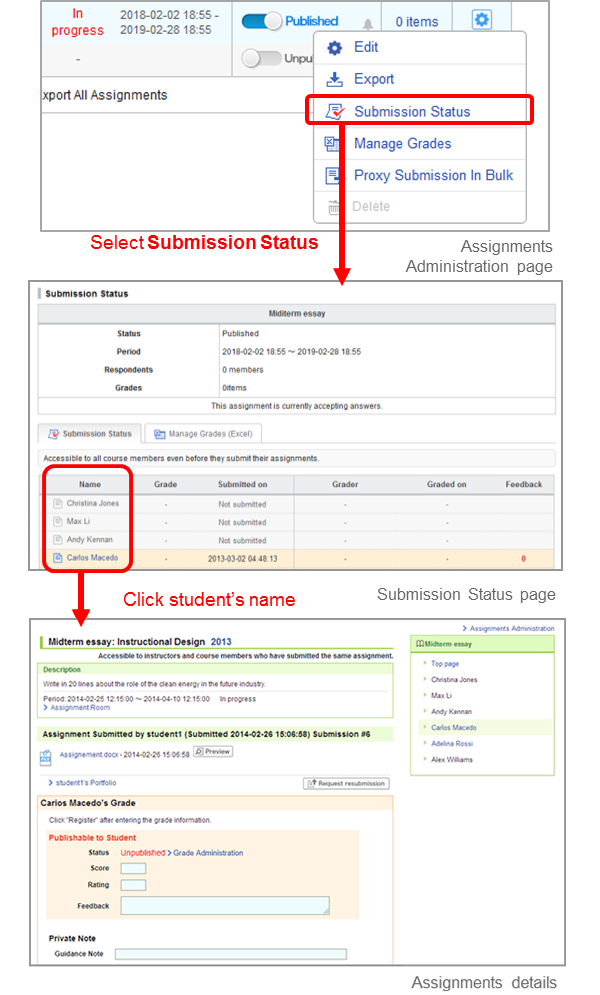
View / Collect submissions
There are two methods to view student’s responses to an assignment.
A: View individual responses on the web
B: Download all responses submitted
A: View individual responses on the web
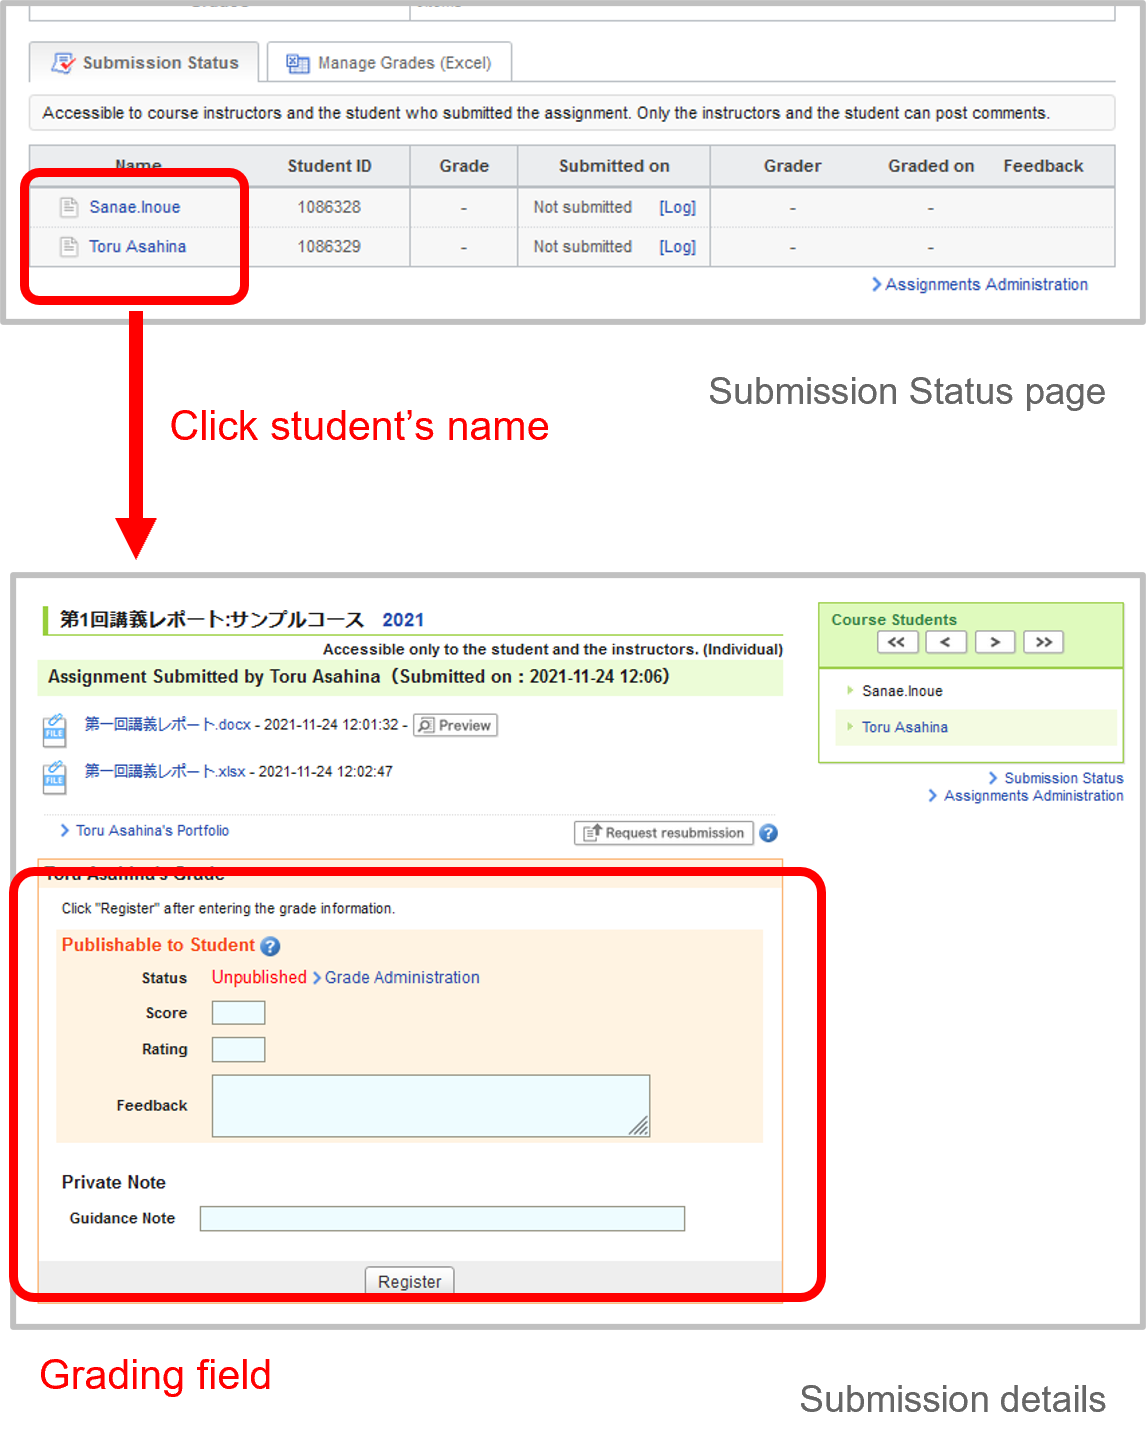
Click on Assignments Administration page and select Submission Status.
On Submission Status page, you may view the student’s response by clicking on the name of the student.
If the file type is "docx", you can click the Preview button next to the file name to view the contents of the file in your browser.
Re-submission of an assignment
It is possible for the instructor to have a student resubmit the assignment. If you click Request resubmission, the assignment will return to one step before the submission and the student will be able to edit and resubmit the assignment.
If the assignment is already closed, edit the close date of the assignment.
If a student uploads an assignment but fails to click the Submit button, the instructor can finalize the submission on the student’s behalf.
You can upload the files on behalf of individual students for the File-based submission assignments. And you can delete only the files the instructor uploaded on behalf of the student.
You can do these two actions on the individual student’s Assignment Room page after clicking the student’s name on Submission Status page.
For the Browser-based submission assignment, you can’t enter the answer on behalf of the students.
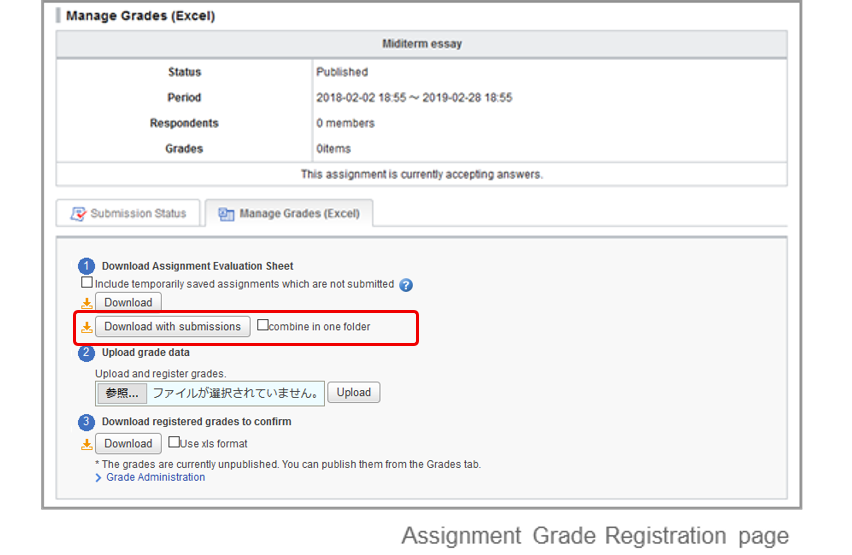
B: Download all responses submitted
Click on Assignments Administration page and select Manage Grades.
Click Download with submissions and you will be able to download submitted responses in a zip file. (Submitted responses are separated in folders by student.)
Details of file submitted by students differ by placing a check mark in combine in one folder.
Without a check mark How it is stored: Folder for each student Folder name: ID Code@User ID File name: Name of file submitted
With a check mark How it is stored: No folder for each student File name: ID Code@User ID@Name of file submitted
Evaluate submissions / Register grades
There are two kinds of methods to evaluate students’ responses and register grades of an assignment.
A: Evaluate students’ responses and register grades individually on the web.
B: Download an Excel sheet, evaluate students’ responses and register grades on the sheet in a batch.
A: Evaluation / grade registration on the web
Click on Assignments Administration page, select Submission Status and Submission Status page will appear.
On Submission Status page, you may view the students’ responses by clicking on the name of each student.
Enter the points in the field Score.
Enter Rating In case of evaluating with character string such as "Good,Excellent,A,B". (optional)
Enter your comments to the student’s response.(optional)
Use Guidance Note as a memo that is only visible to you; students will not be able to view your memos.
Click Update once you fill out the necessary fields.
The background color of the student's row will be orange if there are no comments at all or if the last comment was posted by a student.
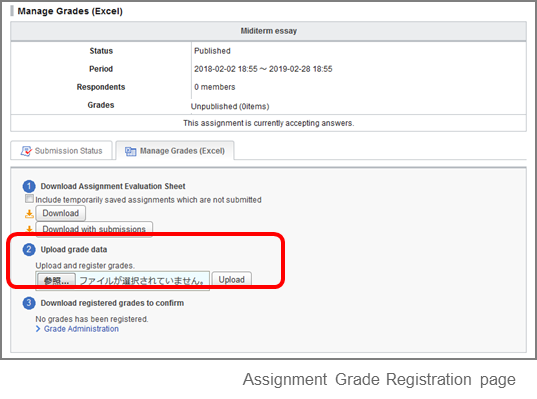
B: Evaluation / grade registration using an Excel sheet
Click on Assignments Administration page and select Manage Grades.
Click Download and download Assignment Evaluation Sheet (this is an Excel file).
Enter in either "#Score","#Rating" or "#Comment" on the Assignment Evaluation Sheet .If you would like to register a score of 0, please input 0 in "# Score".
Upload the Excel file with grades and complete registration of grades.
Publish grades
Neither uploading the grades on the web nor using an Excel sheet makes the grades available to your students. You must now publish the grades to let your students know about them.
Click Grades tab in course menu and open Grades Administration page.
Click of the assignment you would like to publish.
Should you wish to send a reminder message, click Publish and send reminder.
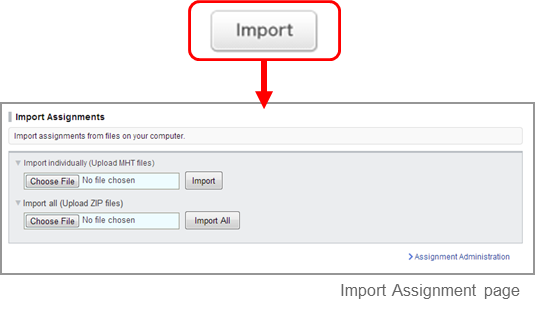
Import / Export an assignment
Instructors may export an assignment and save it to their own computer. The survey will replicate the survey in another course by importing data you have exported.
Export assignments
Export an assignment individually
Click in Assignments Administration page and select Export (a). The test will be downloaded as an MHT file.
Export all assignments in a course
Click Export All Assignments (b) and a zip file containing all the existing assignments will download.
Import assignments
Click Import (c) button on Assignments Administration page.
Use Import individually (Upload MHT files) if assignments should be uploaded one by one. Use Import All (Upload ZIP files) if assignments should be uploaded all together in a zip file
When importing an exported MHT/ZIP file into manaba, the maximum size that can be imported at one time is about 400MB.
Imported surveys need to be published.
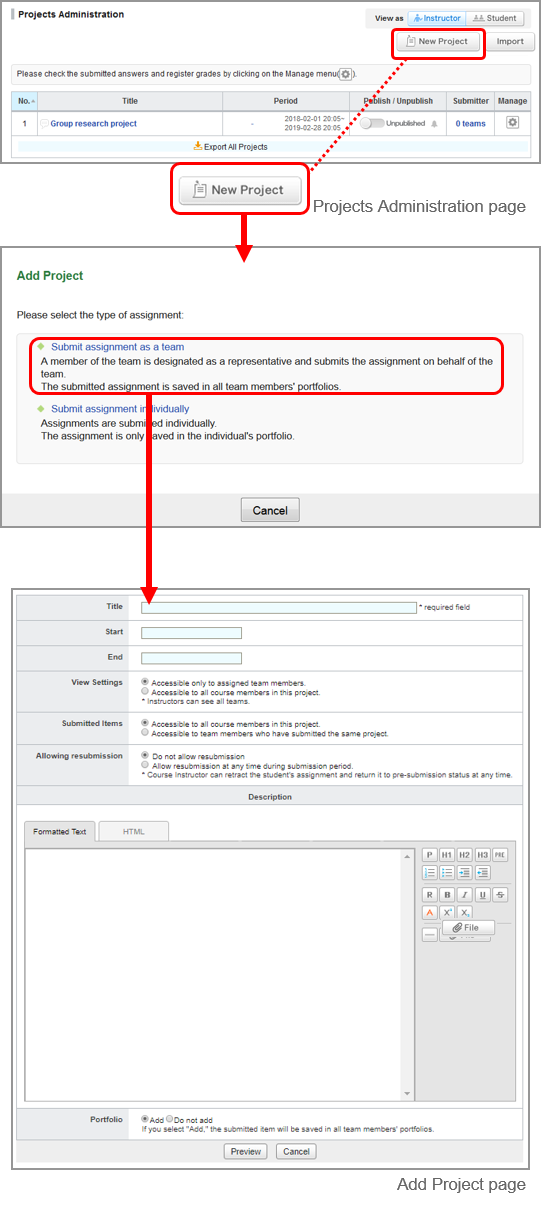
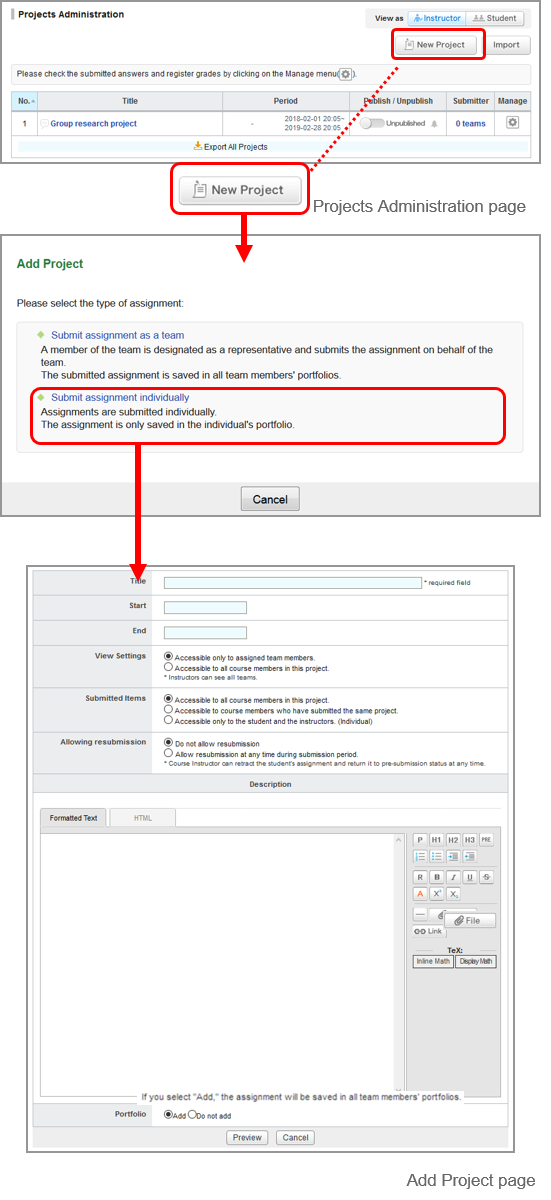
Projects
In projects, course instructors can provide space to divide enrolled students into several teams and have them discuss and eventually submit their project. A forum and a window for submitting a project are available for every team. The submitted projects can be mutually reviewed by students depending on the settings.
Add a project
There are two ways to submit a project.
A: Team submission
Click New Project on Projects Administration page.
Select Submit project as a team and Add Project page will display.
Enter the title of the project.
Enter a start date and end date for the project.(optional)
Students cannot submit the project after the end date. The end date of the project becomes the submission deadline for the project.
As of the End date of the project, students cannot make comments in the forum of the project.
In the View Settings field, you may specify who has access to the team space.
Accessible only to assigned team members.
Accessible to all course members in this project.
Instructors may view all teams.
Students who are not assigned to a team cannot view any project.
In the Submitted Items field, you may specify who has access to the submitted items.
Accessible to all course members in this project.
All course members in the project can access and comment on the submitted items .
Accessible to team members who have submitted the same project.
Only instructors and students who have already submitted a project on the same topic can access and comment on the submitted items.
In Allowing resubmission field, select whether to allow students to resubmit.
If set to "Allow resubmission at any time during submission period.", mamber can delete a submission submitted by not only himself but also another member and resubmit another submission.
If a member resubmits the submission, a reminder email will also be sent to team members other than the member and the instructor.
Enter details of the project or questions you would like to ask.
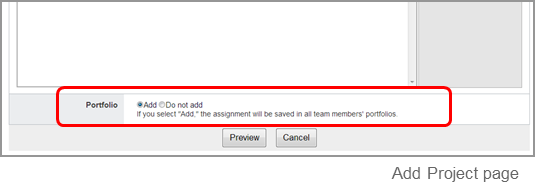
In Portfolio field, select if submission should be added in the students’ portfolios.
Click Preview to check details of the project
Click Save. Then, add a team in the next page.
B: Individual submission
Click New Project on Projects Administration page.
Select Submit project individually and Add Project page will display.
Enter the title of the project.
Enter a start date and end date for the project.(optional)
In the View Settings field, you may specify who has access to the team space.
Accessible only to assigned team members.
Accessible to all course members in this project.
Instructors may view all teams.
Students who are not assigned to a team cannot view any project.
In the Submitted Items field, you may specify who has access to the submitted items.
Accessible to all course members in this project.
All course members in the project can access and comment on the submitted items.
Accessible to course members who have submitted the same project.
Only instructors and those who have already submitted a project on the same topic can access and comment on the submitted items.
Accessible only to the student and the instructors. (Individual)
Only the student and the course instructors can access and comment on the submitted items.
In Allowing resubmission field, select whether to allow students to resubmit.
Enter details of the project or questions you would like to ask.
In Portfolio field, select Add if submission should be added in student’s portfolio.
Use Preview to check details of the project.
Click Save if no revision needs to be made. Then, add a team in the next page.
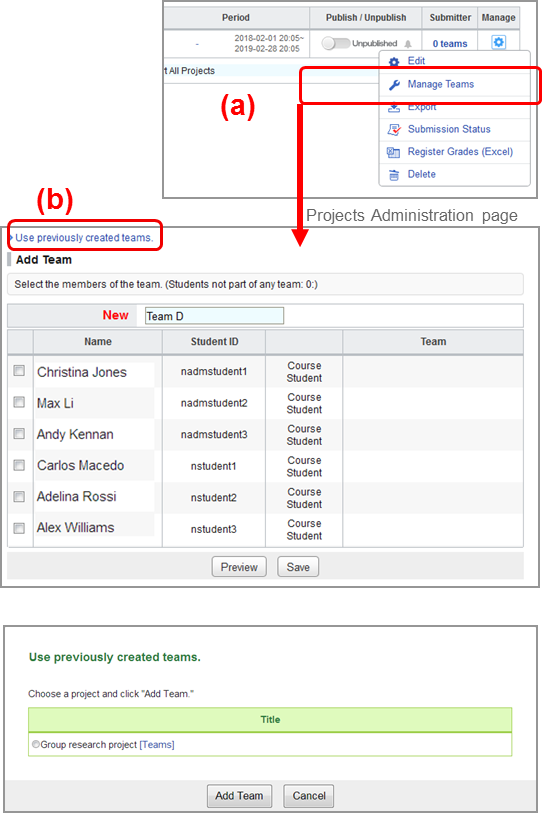
Manage teams
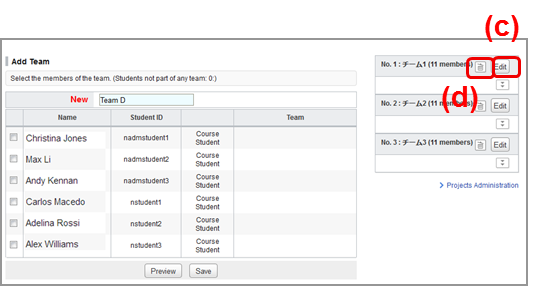
Add a team
Click on Projects Administration page and select Manage Teams (a).
Click Add Team and Add Team page will display. In the field for the team name, manaba has automatically allocated a team name. (e.g. Team A, Team B …)
Check course members you would like to add in a team and click Add Team.
Check details and click Save if no revision needs to be made.
Copy teams from past projects
You may copy teams of past projects.
All teams belonging to a project will be copied.
Click Manage Teams in Projects Administration page.
Click Use previously created teams (b) in Add Team page.
A list of past projects will appear in a pop-up. Confirm team names and members from Teams. Select the project which contains teams that you would like to add and click Add Team.
Modify a team
Follow the steps below in order to change a team name or team members:
Click Edit (c) on the team you would like to modify.
Modify the team name and members and click Edit Team.
Check details and click Save if no revision needs to be made.
Delete team
Follow the steps below in order to delete a team:
For the team you wish to delete, click Delete (d)
The team forum and submitted projects (except submissions added to the portfolio) will be deleted. Additionally, once the team is deleted, it cannot be restored.
Work on a project in teams
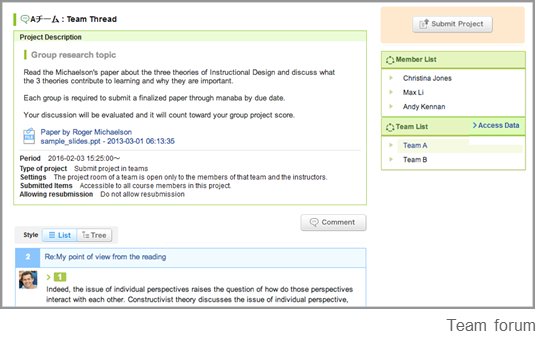
Each team has their own forum where only the assigned team members and course instructors can post comments.
No comments can be made in forums of other teams’ even if the team space is open to all students registered in the course to view.
Forum
You may comment in the forum of your team’s project in the same process as adding a comment to a forum in a course. ( Also see see “Add a thread/Add a comment” ) Instructors may make a comment on the forum of any team.
Students cannot comment after the end date, which the instructor entered when the project had been added. (Students can still view the forum after the end date.)
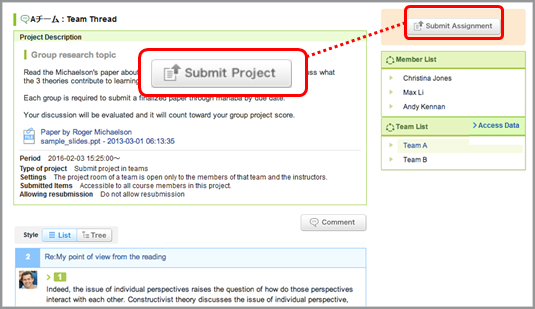
Submit project
In the forum of a students’ team, students will submit their work from the Submit Project button. They may submit files until the end date which the instructor entered when the project was added.
The Submit project button does not appear on instructor’s page.
Mutual review
In order to view submissions of other teams or members, click Submitted.
You can post comments to their submissions.
Request resubmission
In the following the steps, the instructor withdraws the student's submission that has already been submitted and can return to the state before the submission was confirmed.
After withdrawal by the instructor, students will be able to access and resubmit the assignment.
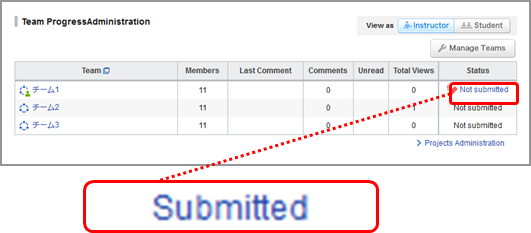
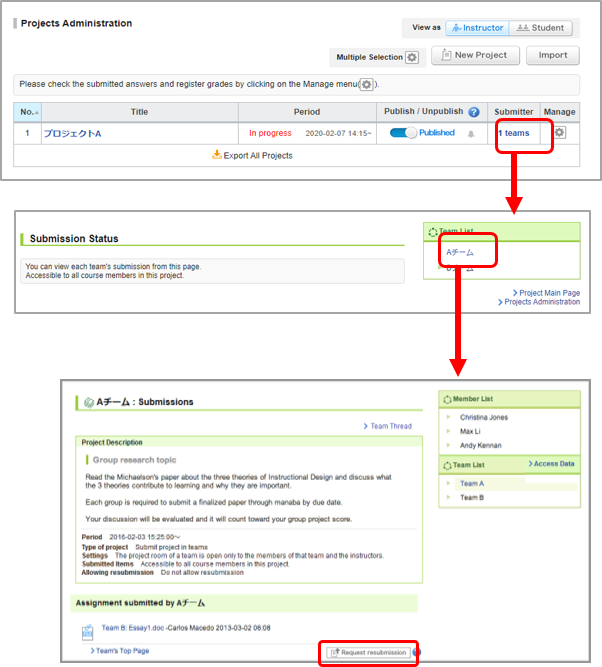
In the "Projects Administration" screen, click the "Submitter" field of the assignment.
On the "Submission Status" screen, click the team (or student) you want to resubmit in the "Team List".
Click the "Request resubmission" button on the "Submissions" screen.
Click "OK" button on the confirmation screen.
If the end date of the project has already passed, please change the end date to a later date so that students may resubmit their projects.
Reminders are sent to the students,
Even you click Request resubmission, the old file that the student had submitted remains available in manaba. Students may send the old file and the new file together as a resubmission, so that the old file will also be added in their portfolio.
Score project / register grades
You may score the student’s submissions for projects and register grades in manaba.
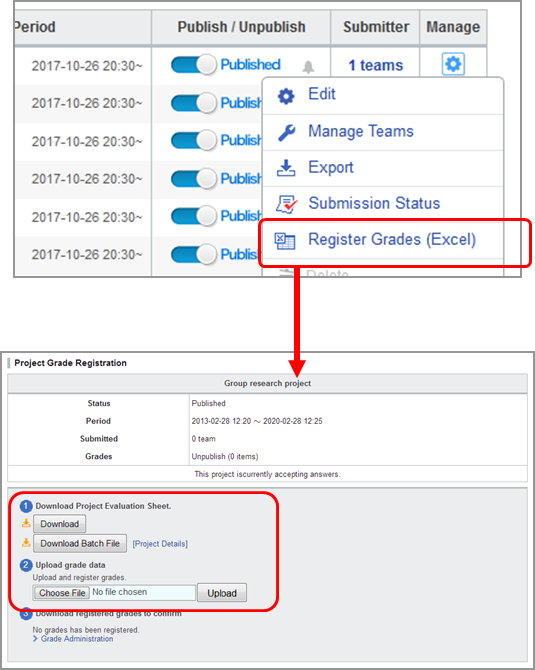
Click and select Register Grades (Excel) in Projects Administration page.
Project Evaluation Sheet will download.
Enter points in the column titled # Grade and enter your feedback in the column titled # Comment.
Upload the Project Evaluation Sheet with grades data from Upload, and complete registration of grades.
Click Grades tab in the course menu and publish grades from the Grades Administration page.
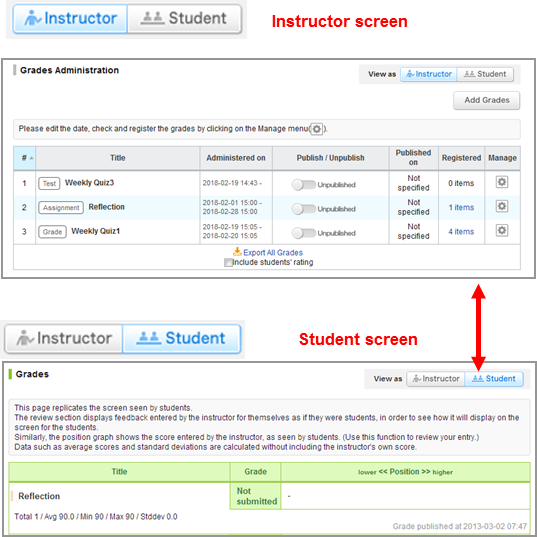
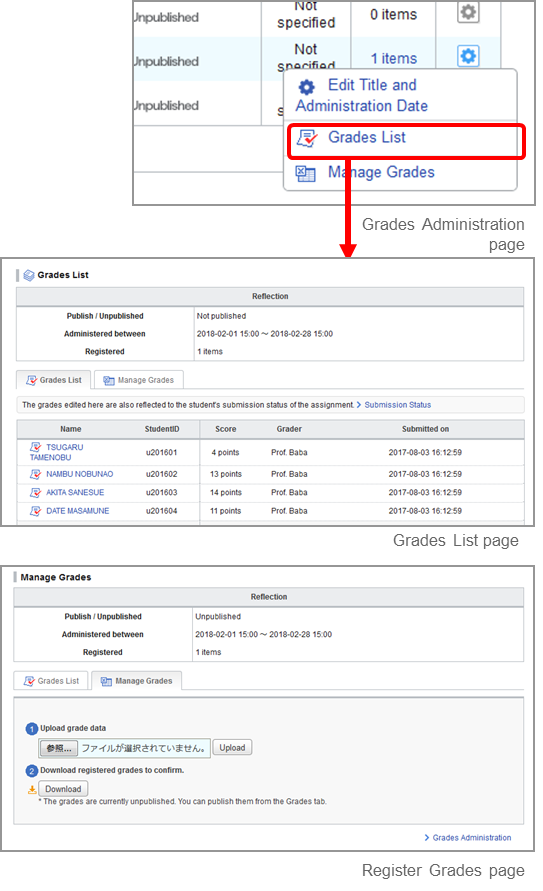
Grades
You may publish grade information of tests and assignments handed out in manaba; grade information may include scores and feedback. You may also register grades of extracurricular activities, practical training, labs or attendance.
Register grades
Register grades of Autoscore Tests, Manual Score Tests, Assignments and Projects
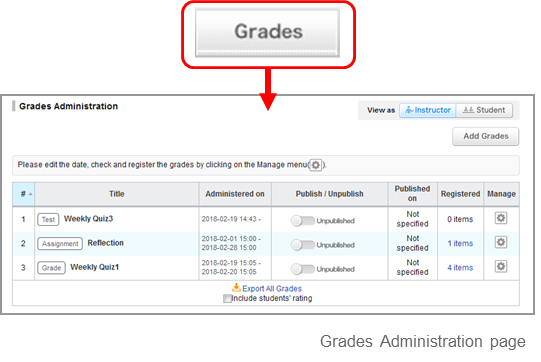
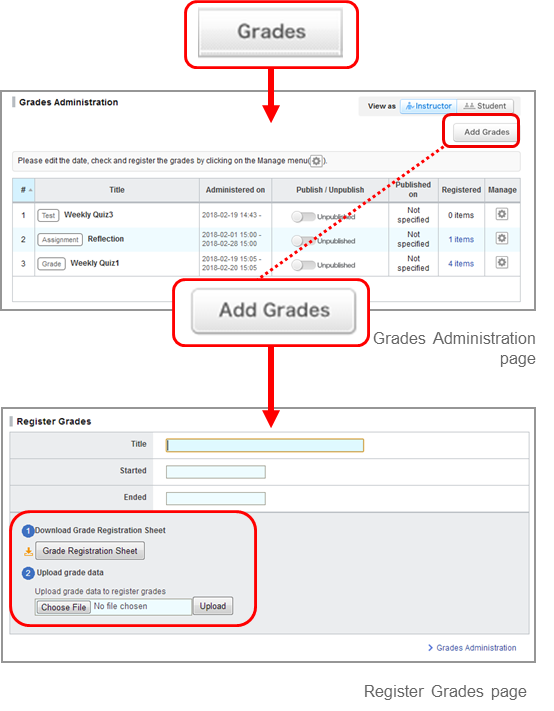
Click Grades tab in the course menu and open Grades Administration page. All grades registered from Tests Administration page and Assignments Administration page and Projects Administration page are automatically listed in the Grades area.
Register other grades
Click Add Grades from Grades Administration page.
Enter the title of the grade.
Enter the start date and end date of the test / assignment.(optional)
Download Grade Registration Sheet.
Enter in either "#Score","#Rating" or "#Comment" on the Grade Registration Sheet. * Steps to fill out the sheet are explained inside this sheet.
Click Upload and upload the Grade Registration Sheet you have filled out. On this sheet, registration is possible only for the line in which information is entered in one of "#Score", "#Rating" and "#Comment". If you would like to register a score of 0, please input 0 in "# Score".
If you do not register any grades, you can not publish it.
Saving the grades does not make it available to your students. You must now publish the grades to let your students know about them.
Once grade registration is completed, Download registered grades to confirm section will appear. Click Download and check the grade data you uploaded.
Publish grades to students
In order to publish registered grades to students, click in Grades Administration page.
Should you wish to send a reminder message, click Publish and send reminder.
Use Student button to view the list of grades which are published to students.
Check uploaded grade data thoroughly before you publish grades.
Overwrite grades / Download grades
Follow the steps below in order to change scores or comments of a test or assignment.
A : Register grades on the web
Click on Grades Administration page and select Submission Status.
Click the user’s name you would like to score and the user’s Register Grades page will be opened.
Click Update once you fill out the necessary fields.
To delete all items of registered grades, please click the "Delete Grade" button. If you want to return only registered "#Score" to "Unscored" not all items, please confirm the next "B : Register grades using an Excel sheet".
B : Register grades using an Excel sheet
You can not use the Excel sheet to delete all items of registered grades. The method of correcting the registered grade is as follows.
Click on Grades Administration page and select Manage Grades.
Upload Grade Registration sheet again from Upload and the grade data will be updated with new data.
Once update is completed, click Download and check grade data you uploaded.
On the Grade Registration sheet, overwrite registration is possible only for the line in which information is entered in one of "#Score", "#Rating" and "#Comment". Even if all the items are left blank, the results of registered students will not be deleted.
To return the registered "#Score" to "Unscored", make "#Score" cell blank and enter text or numerical values in either "#Rating" or "#Comment" Please register. To register "#Rating" or "#Comment" in addition to "#Score" already registered, leave "#Score" cell entered Please upload.
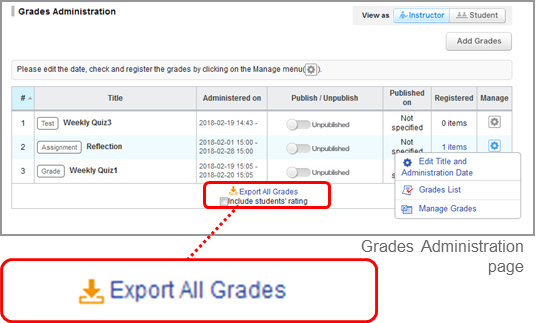
Download all grades
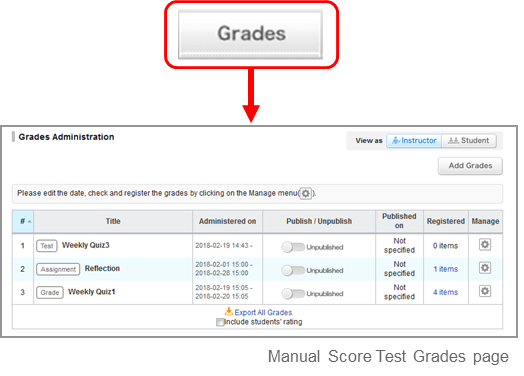
Click Export All Grades from Grades Administration page. You may download all the grades registered in manaba at the moment.
If you check Include students' rating column, you can download not only total score but also "rating".
Forum
There is a forum in each course. You can use it for discussion purposes among instructors and students.
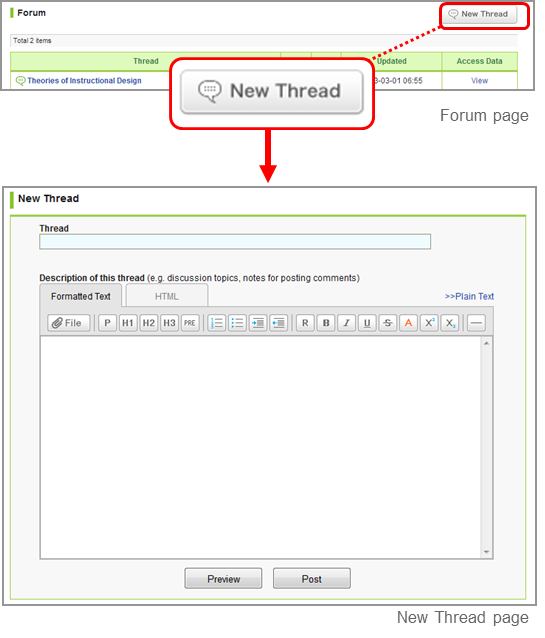
Add a thread
Click New Thread in Forum page.
Enter the title of the thread.
Enter the description of the thread.
You can attach various files such as video files and images. (For more information about adding a file, please check “How to add a file”. )
Click Post and create a new thread. ※Students receive reminders by email if they set Receive in the following reminder on the Individual Settings. “New comments made on your course”
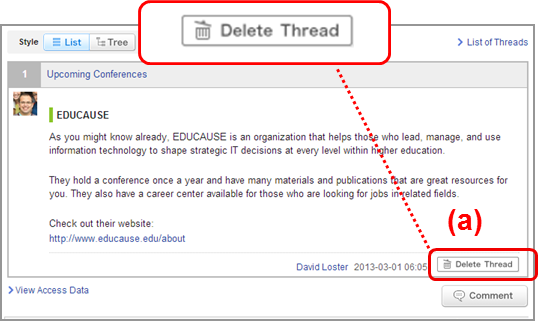
Delete a thread
Each thread can be deleted the author and the instructor. Click Delete Thread (a) to delete the thread.
Once a thread is deleted, all comments and attached files in the thread will be deleted as well. This is not a recoverable operation.
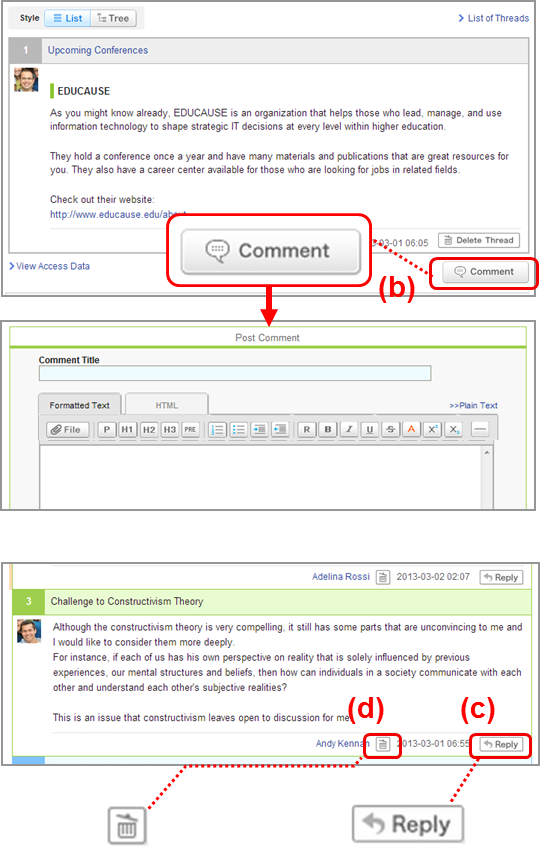
Add a comment
Select a thread you would like to add a comment to and click Comment (b).
You can add a response to a particular comment on a thread by clicking Reply (c).
Enter the title and text.
Click Post to add a comment in the thread. ※The other course members receive reminders by email if they set Receive in the following reminder on the Individual Settings. “New comments made on your course”
Delete a comment
Each comment can be deleted by the person who posted it as well as instructors by clicking (d) on the comment. Once you delete a comment, it can not be recovered.
An orange line appears to the left of the first comment you view.
The orange line will remain faded for the first hour after it is displayed. After the hour is up, the orange line will disappear completely.
* When there is no access to the updated comment (when the status is Update unread), it turns back to orange.
View access data of a thread
Instructors can view student access data of each thread. Please click View on the target thread.
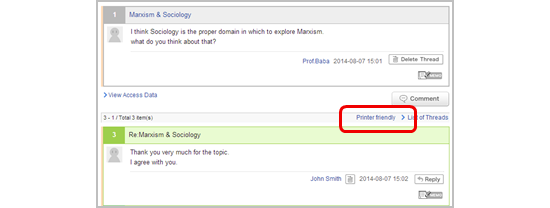
Click on the Printer friendly link on the thread you would like to print, then the printer-friendly page will appear.
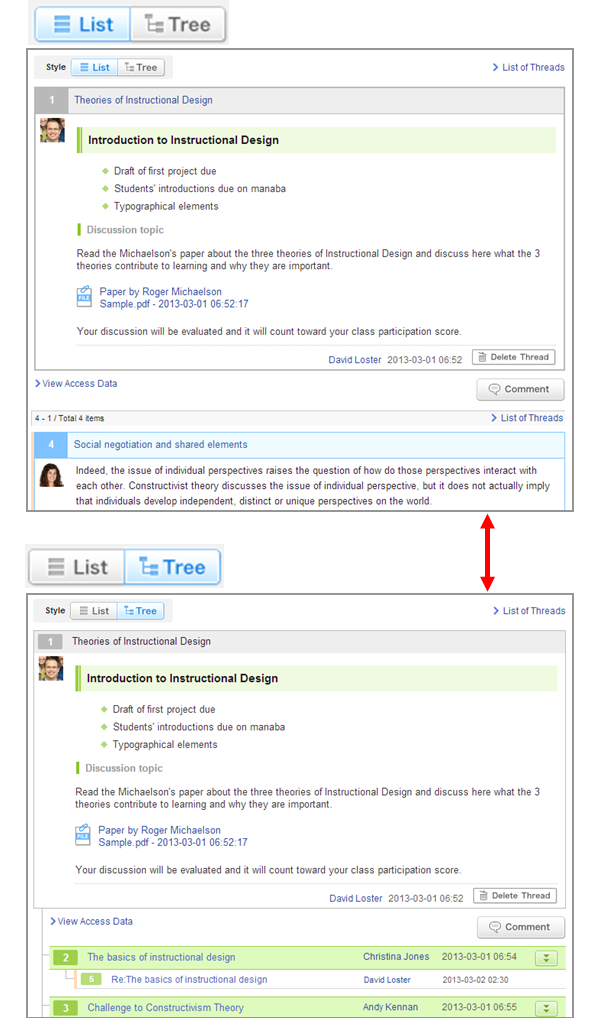
Select display of comments
There are two ways to display comments. Go the Style button to switch the setting.
List
Comments are displayed top-down from the latest post.
Tree
Comments are displayed top-down by the oldest post. Response for each comment is displayed associating with the original comment.
Mutual evaluation by the "Like" button
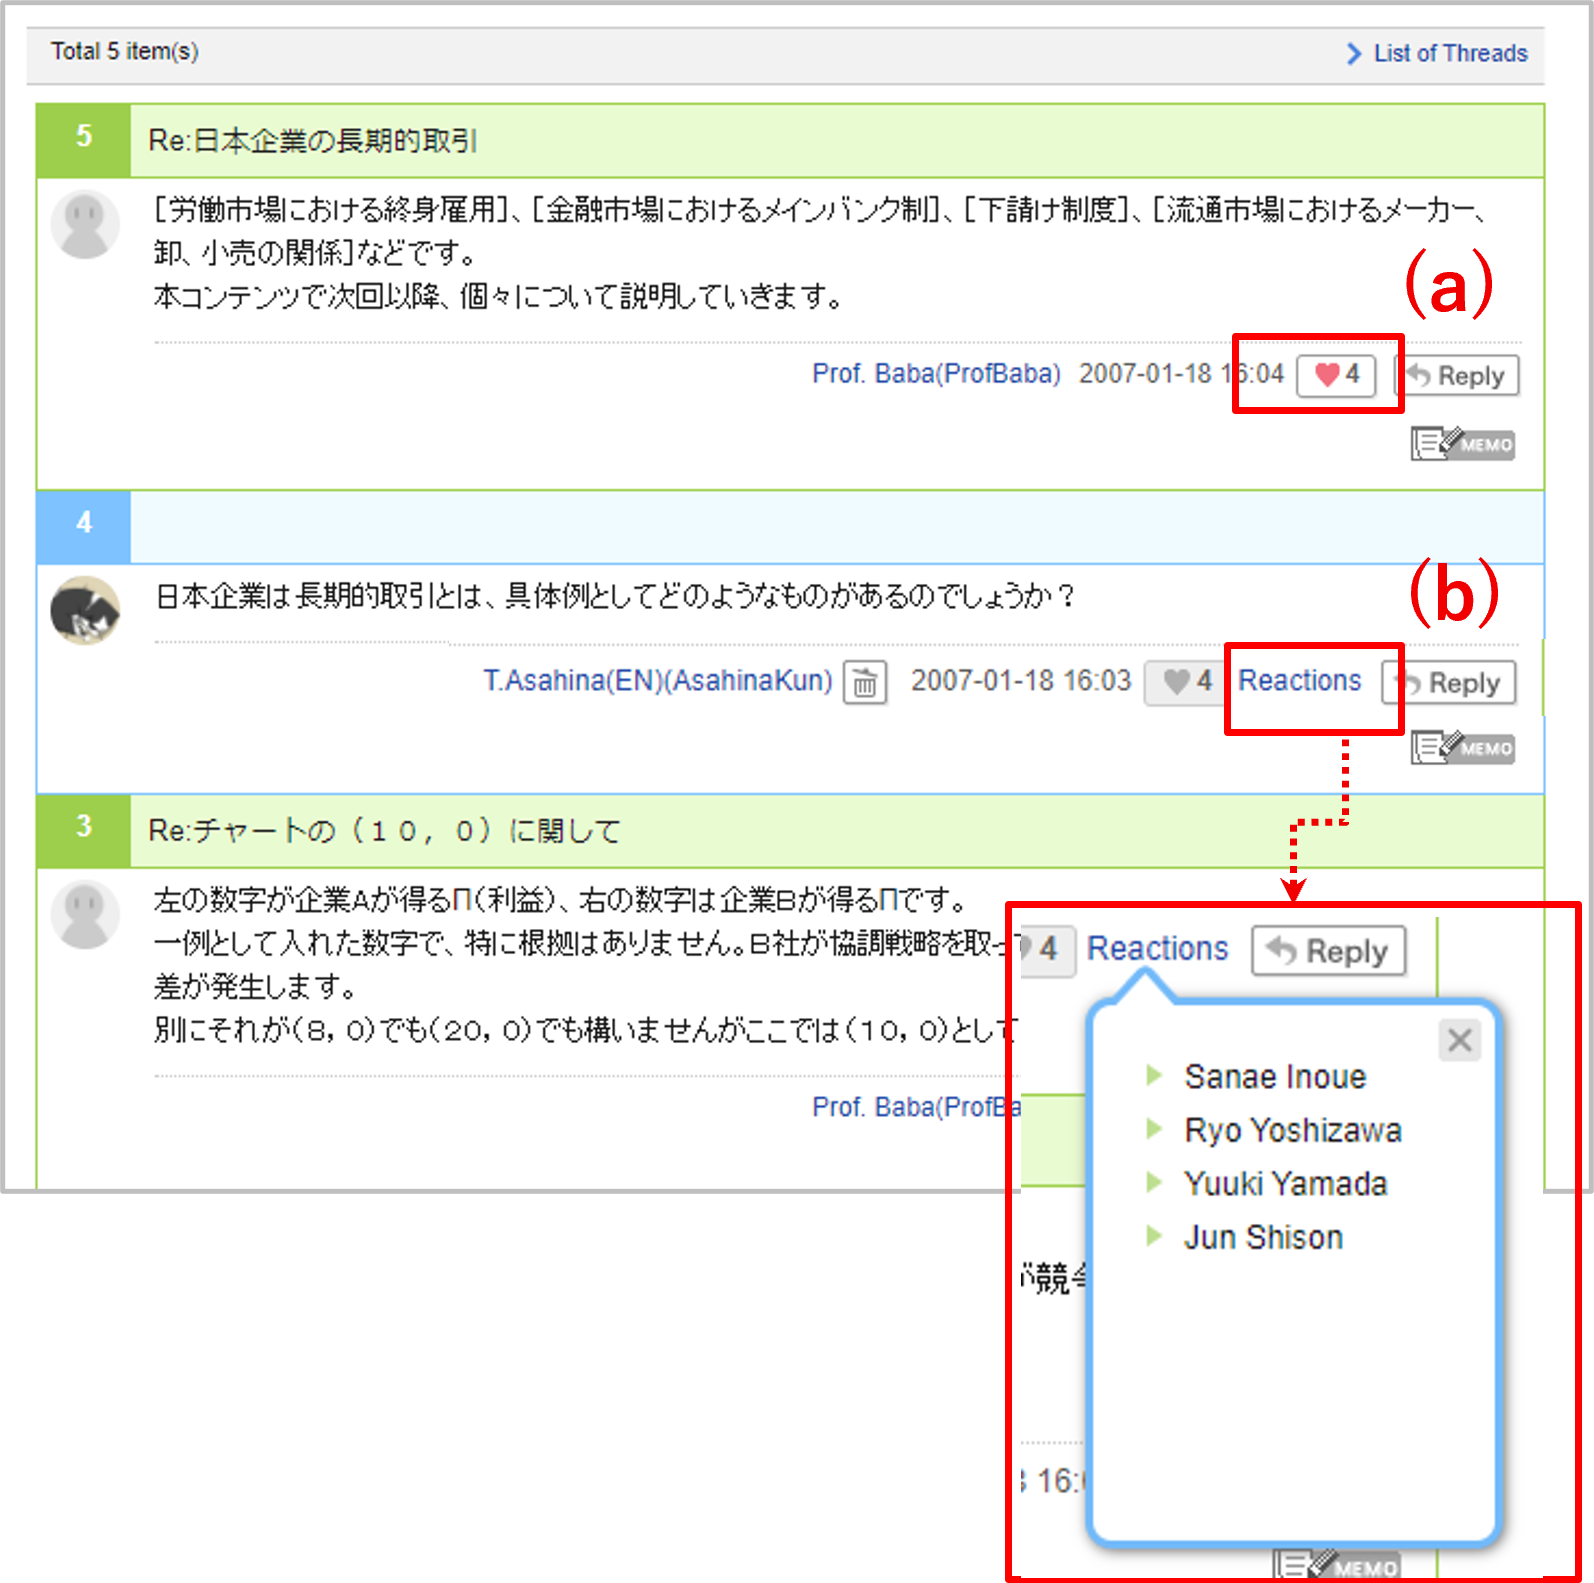
What is the “Like” button?
By clicking the "Like" button (a), you can "Like" comments on the forum. You can also view the list of users who have liked your comment by clicking the "Reactions" button (b).
You can cancel the "Like" you have given by clicking the button again.
You cannot "Like" your own comments.
Resources
Resources is a space where instructors can easily post resources, including teaching materials. Resources added are published only to the course members.
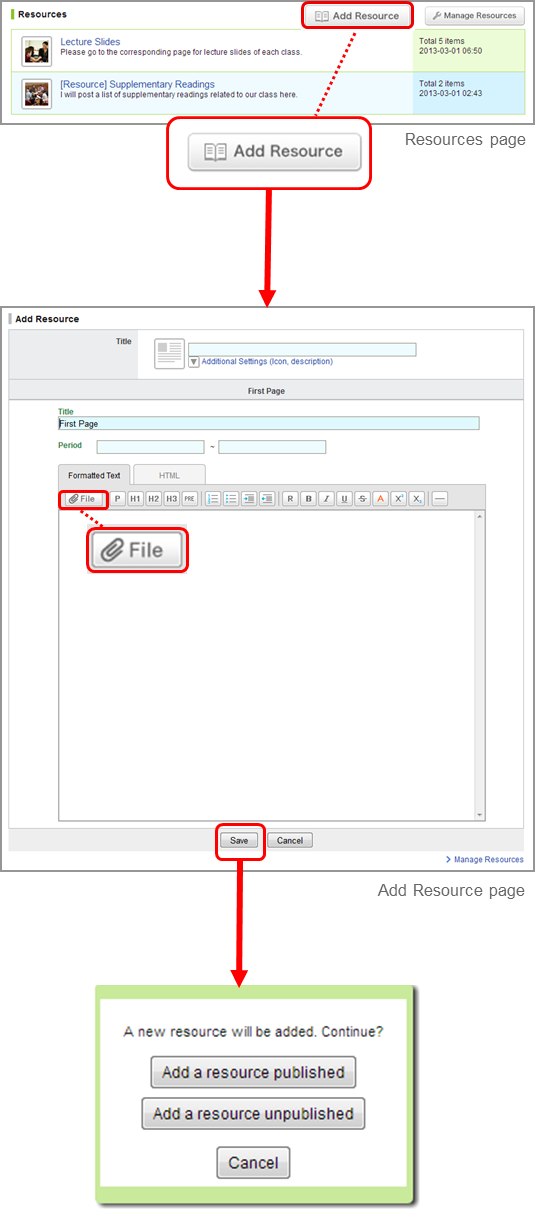
Add resource
Click Add Resource from Resources page, to open Add Resource Page.
Enter the title of the resource.
Set the resource icon or description, click Additional Settings. You can select the icon and enter the description. Size of an icon is 60x60 pixels. (Different image sizes can be uploaded.)
Enter the title of the page.
Set the period for this resource to be published.(optional)
Enter the text for the page of the resource.
You can attach various files such as video files and images. (For more information about adding a file, please check →“How to add a file” .)
7. A panel will appear after you click on Save.
8. Click on Add a resource published if you want to make the page available to the students immediately. Or choose Add a resource unpublished if you want to keep the page unavailable to students for the time being.
Edit Resources
Edit title and description of resources
Click in Manage Resources page and select Edit Title and Description (a).
Modify the contents title, icon and description then click Save.
Add page
Click in Manage Resources page and select Edit Pages (b).
Click Add Page (c) and open Add Page screen.
Enter the page title and text. You may add multiple pages.
For each page, you may set the publication period.
Check details of the page and click Add to add the page if no revision is needed.
Edit each page
Click in Manage Resources: Resource’s page and select Edit (d). Then, you can open the Edit Page.
Click Update after editing the page. * You can also edit pages from the bottom of each page for the students.
Publish Resources
Pages can be published individually and the entire resource can also be published including all its pages.
Publishing entire resource
Click in Manage Resources page
Publish specific pages
Click and select Edit, and open Manage Resources page.
Click to publish or click to unpublish each page.
View access data
Instructors can view access data of each student. Click Access Data on each page to view it.
An orange line appears to the left of the first resource frame you view.
The orange line will remain faded for the first hour after it is displayed. After the hour is up, the orange line will disappear completely.
* When there is no access to the updated resource (when the status is Update unread), it turns back to orange.
The color of the triangle icon of the page title displayed in the list on the right side of the screen will be as follows. ・Pages that have not been read and have been displayed for less than an hour: Orange ・Pages that have been open for an hour since they were first displayed: Green
* When there is no access to the updated resource (when the status is Update unread), it turns back to orange.
About status
Depending on the student's access, it will change into three status.
Unread : The resource has not been accessed by the student after it has been published. *Even if the resource is accessed outside the period for this resource to be published, it will be treated as unread.
Read : The resource was accessed by the student during the period for this resource to be published after it was published.
Update unread : Instructor has updated an already published resource (which students have accessed before), but that updated resource is not yet been accessed by students.
The student's first access to the newly published resource after creating or editing the resource, is displayed in the "Viewed at" column.
Even if the resource is accessed many times after the first access,unless the instructor edits the resource, the "Viewed at" column is not overwritten,and the first access is displayed.
If you access the resource again with the status of "Update unread", the status will be changed to "Read" and "Viewed at" column will be overwritten by the date and time of the re-access.
Import / Export a resource
Instructors may export a resourse and save it to own their computer. You may replicate the resourse in another course by importing data you have exported.
Please refer to the tests or assignments’ page, in order to inport / export a resourse.
When importing an exported MHT/ZIP file into manaba, the maximum size that can be imported at one time is about 400MB.
You cannot replicate the comments of the resources.
Delete Resources
Delete entire resource
Click Manage Resources on the top right button of the Resources screen.
Change the content to Unpublish on the Manage Resources screen.
Click of the content and select Delete.
Delete page by page of content
Click Manage Resources on the top right button of the Resources screen.
On the Manage Resources screen, click on the Title of the content.
Change the status of the page to Unpublish.
Click of the page and select Delete.
Portfolio
Students have a portfolio space to accumulate their work submitted and comments for each course.
Collect items in portfolio
Tests / Surveys
Course instructors can choose to add or not to add tests or surveys into the course members’ portfolios from the add test and add survey pages.
Assignments
Course instructors can choose to add or not to add assignments into the course members’ portfolios from the add assignment page. Submitted assignments by students can be stored into their respective portfolio by selecting the setting from the list below:
Accessible to all course members.
Accessible to instructors and course members who have submitted the same assignment.
Accessible only to the student and the instructors. (Individual)
Projects
Projects submitted are all added into course members’ portfolios. All projects submitted by team are added into each team member’s portfolio.
Comments
All comments made in forums and mutually reviewed projects / assignments are stored into each course member’s portfolio.
View students’ portfolios
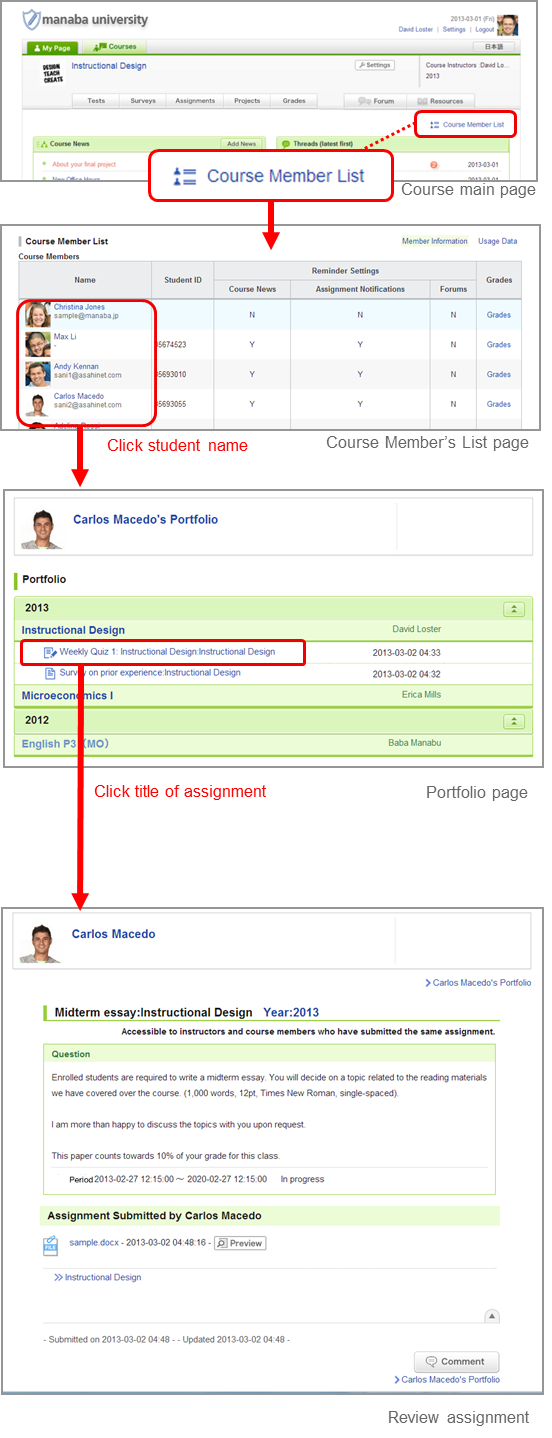
Click Course Member List from the course main page.
Click the name of a student and open the corresponding portfolio.
You can also access the student’s portfolio by clicking the individual’s name who made a comment in Forum.
Click the title of the assignment to view student’s submission.
Click Comments to view the history of students’ comments. If you click the title of the comment, the corresponding page will appear.
Files added to the original comment can be downloaded from the comment history page from each student’s portfolio.
Instructors may not access all students’ portfolios. They can only access their course members’ portfolios.
The data instructors have access to:
Grades
Comments in the forum
Assignments which have been set up to be added into student’s portfolio
Course member’s portfolio page is displayed by academic year and course. Course instructors only have access to the courses they teach. (For other courses, just the names of the courses are displayed.)
Students cannot access other students’ portfolios.
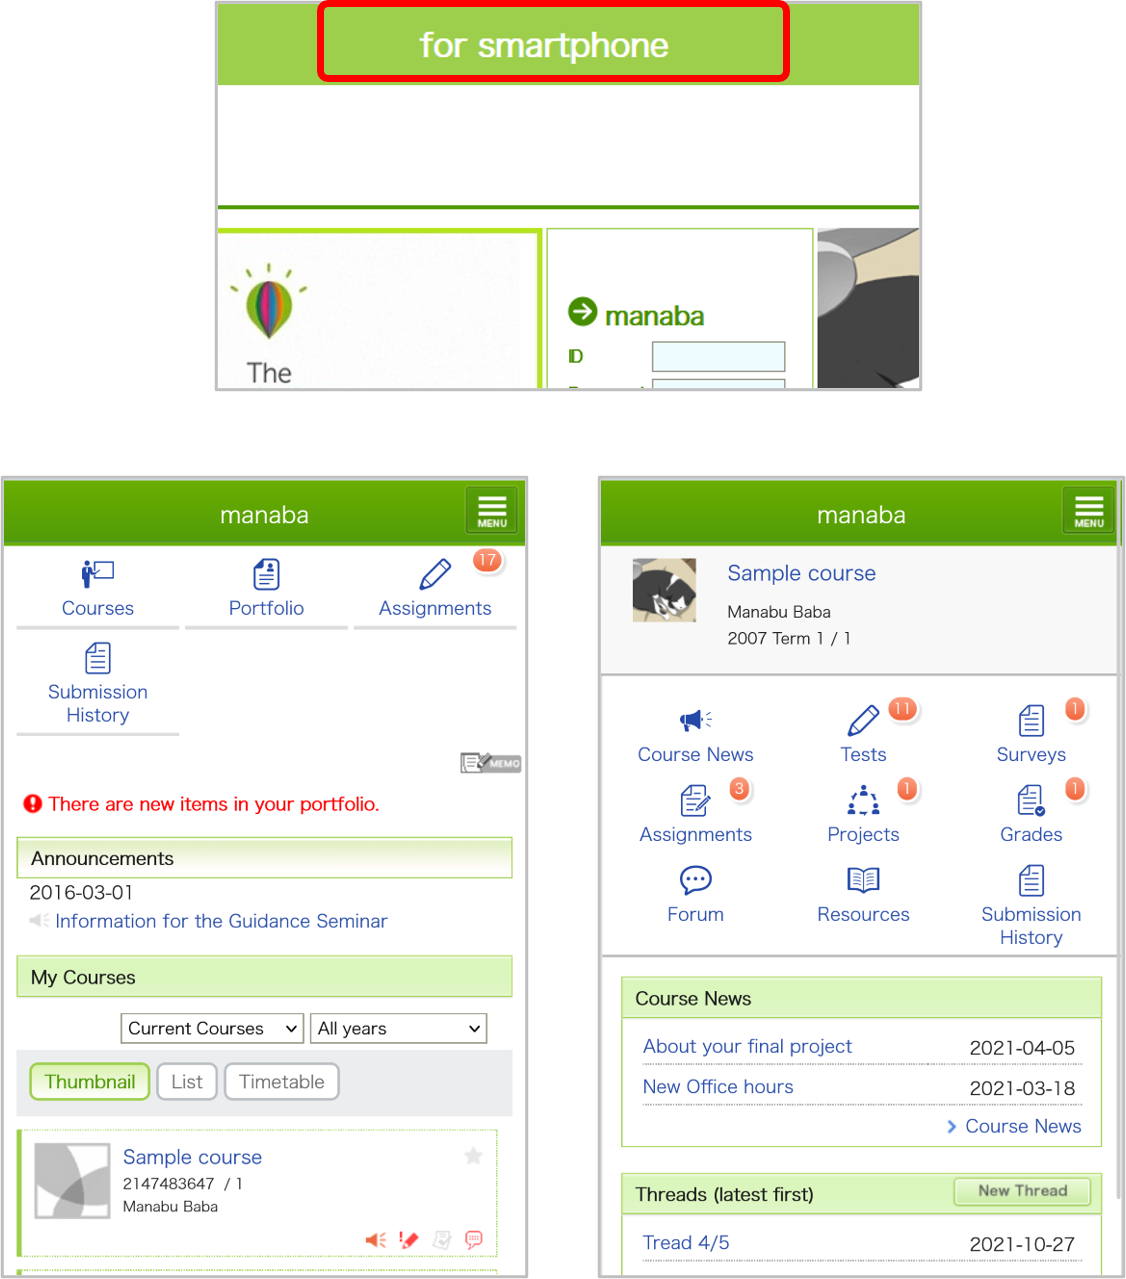
Use on your smartphone
You may use manaba either on a smartphone.
Use New smartphone-optimized screens
When you access the site page with your smartphone, the link for the smartphone-optimized screens are displayed at the top (of the screen).
* To return to the desktop-optimized screens, please access the link at the bottom of the screen
The smartphone-optimized screens mainly can be used on the student's functions.
Use old smartphone-optimized screens
Old smartphone-optimized screens is scheduled to be discontinued. To access it, click on the link on My Page in the desktop-optimized screens.
Old smartphone-optimized screens mainly can be used on the student's functions. The following operations are not supported on Old smartphone-optimized screens, so please perform them on the desktop-optimized screens.
Frequently used courses (marked with ★) function at the top of the screen.
Profile settings
Comment function for tests and surveys
Response function on the forum
Memo function
Viewing the manual
Manage Deleted Contents
You can check the deleted date and user who deleted for deleted grades, forums, resources (excluding pages), and course news. Mistakenly deleted contents can be restored by selecting Change state to be active from Manage .
How to check deleted contents and revert to previous state
Click Manage deleted contents from Course settings.
List of deleted contents within the course shows up.
How to restore deleted contents to previous state individually
Click (A) in Manage column of applicable content.
Select (B) Change state to be active.
Select OK in confirmation popup.
How to restore more than one deleted contents to active state
Place a check in the check box under the very left column (C) of the applicable content.
Click (D)The states of the content you checked will be change to be active in the bottom of the page.
Select OK in confirmation popup.
In the page, you can only see the title. Assignments and forum details cannot be seen.
By reverting assignment to active state, submitted contents for the reverted assignment can be viewed again.
Deleted items which can be reverted
Course news
Tests *
Surveys
Assignments
Grades
Resources (excluding pages)
* All added exercise questions are deselected when the exercise is deleted. You need to re-add exercise questions after you revert to active state.
* The states of threads and comments cannot be changed. If you would like to use them, please remake them.
This function is a temporary way of checking contents which are mistakenly deleted. Deleted data such as assignments and grades are out of data assurance. Please try not to delete important data but keep them in Private state.
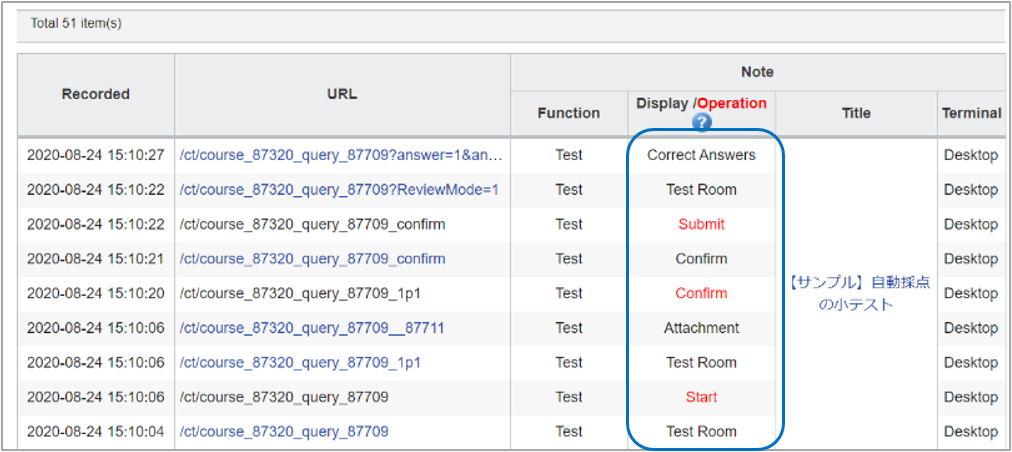
Student Access Log Function
Access Log
Students' operation history (e.g., assignment answers, access to news, etc.) within the course could be viewed by specifying date, applicable assignment, and news.
You can only check the logs for the past year.
Access Log Function can only be used by course instructors and campus dept administrators.
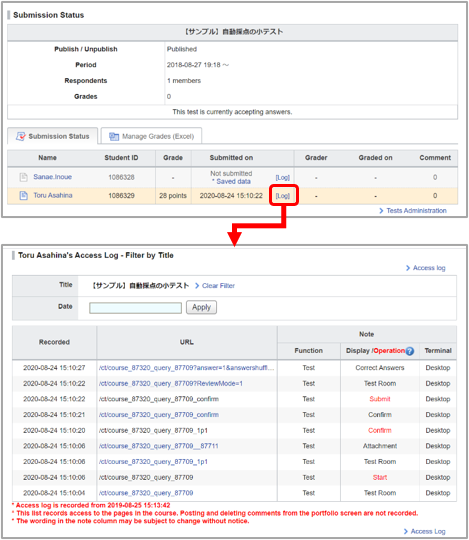
If you get an inquiry from a student that his/her submitted project says Not submitted, you can check that student's operationhistory (whether that student has been accessing the assignment and proceeded to submission page, etc.)
Check Access Log - How to view log
Log is shown in updated order, meaning that the latest log is showing in the very top of the list. The viewed page (e.g., List) will be shown under Display/Operation in black, and operation (e.g., Submit) such as button click will be shown in red.
Access Log function covers only major operations from answering to submission of assignment, but it may not be covering activities via optional function. In that case, Function and Display/Operation will be blank, but URL will be shown for reference.
Check Access Log - How to check assignment operation log
Click Log in Submission Status page of assignment.
You can check the applicable students' access log and operation history.
You can only check the access log within the course. You cannot check log for posting/deleting comments from portfolio.
Operation is log for the action itself such as clicking the button etc., and it does not necessarily mean the completion of a certain process. For that reason, details indicated in Operation and the actual assignment status may not be the same.
Examples ・Assignment was submitted, but it was not actually accepted because it did not make the end date. ・Assignment was submitted, but cancelled submission because it was out of the specified date/time.
However, if there is no Submit under Display/Operation. It is likely that submission was not performed.
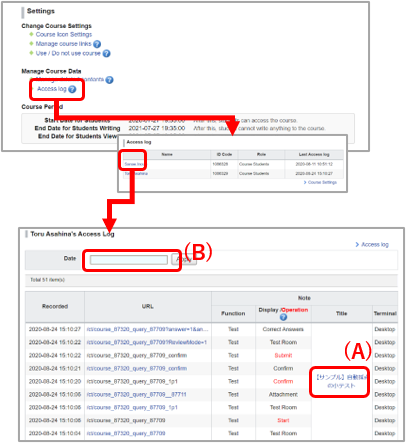
How to check Access Log - entire log within courses
Click Access Log in course settings page. List of students taking the course shows up.
You can check the operation log within the course of an applicable student by clicking the student name.
Click the Title (A) shown under Note and you can show only the log related to that assignment and news by specifying the date (B).
You can only check the operation log of the student who is taking the course. Operations by instructors such as Publish/Unpublish of a project are not shown.


 in Course News Administration page, and click Edit Date (b).
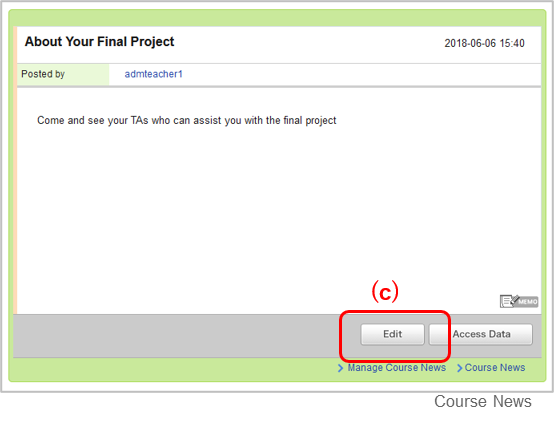
 to clear the selections.
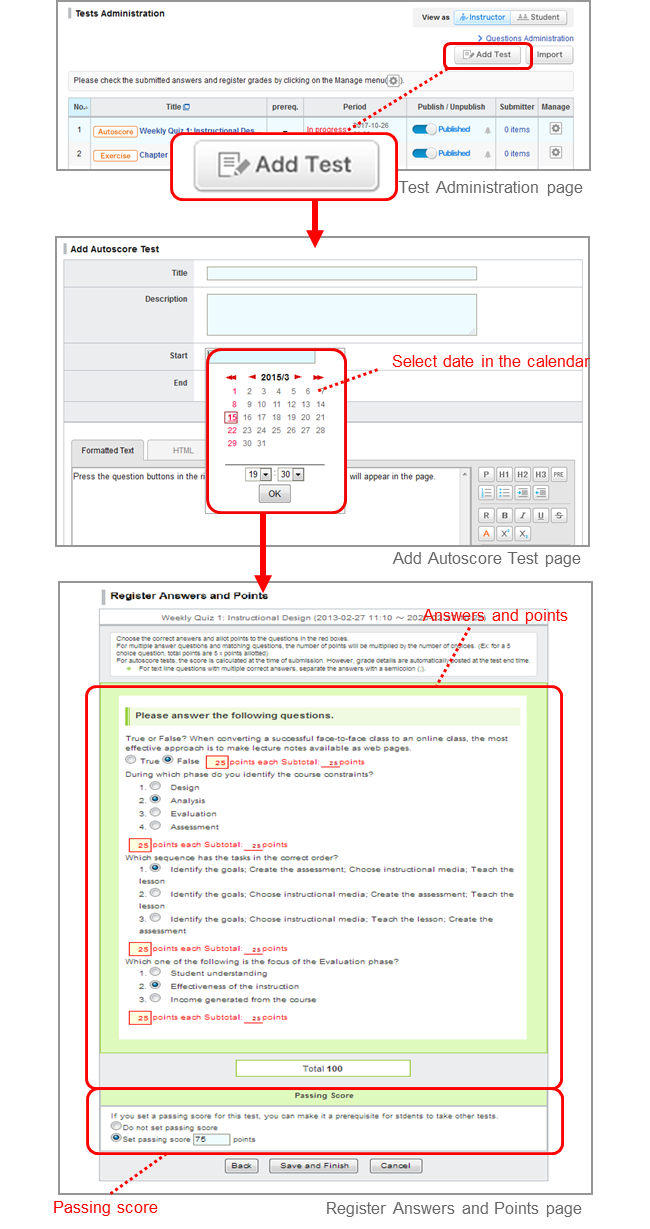
 on Tests Administration page.
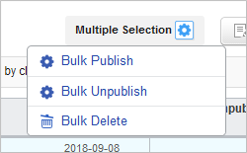


 (d)
(d)


 to unpublish each page.